How to approach machines properly
Today, shops offer a wide selection of small machines with numerous attachments, accessories and special tools that can greatly expand the range of work. It should be noted, however, that before purchasing such machines it is always better to learn to do with hand tools what we could later perform with a machine. In that way, guided by needs that have already been established, we will be able to acquire the exact type of machine we require together with the appropriate accessories. Finally, we will also be able to use the machine properly. Before deciding to buy, it is good to check whether it is worthwhile at all. The same work done by hand requires much more time and effort; a machine, on the other hand, has its purchase price, occupies space and requires maintenance. It is therefore useful to ask how much the machine will actually be used during a month or a year and whether it can be kept somewhere without difficulty.
Almost all of us believe to some extent that, with the help of a machine, we will be able to do more quickly and easily what we are unable to do with hand tools. In most cases this is an illusion. After purchasing a machine with the corresponding equipment, we abandon it after a series of unsuccessful attempts and, worse still, abandon the entire field of work as well. A person remains convinced that the group of tasks for which the machine is intended is simply beyond their abilities. In fact, the logical path should have been followed: first learn to work by hand, and only then buy a machine.
Someone who does not know how to use a hand drill will also use an electric drill incorrectly or with unsatisfactory results. Someone who does not know how to saw boards, panels or battens with hand saws will regularly obtain poor results with a power saw as well, with a risk of injury, especially with circular saws. Someone who does not know how to sharpen a chisel on a sharpening stone will not know how to do it on a round powered grinder either. A period of manual apprenticeship is therefore certainly necessary before beginning to work with machines and their ever more numerous attachments.
The electric drill and its basic purpose
According to statistics, eight out of ten families in the USA own an electric drill, and six out of ten in Great Britain. An electric drill can be used to drill holes, it can be mounted on a stand and used as a bench drill, like a true “sensitive drill” in a machine shop, or rotary tools can be attached to it. It can also serve as the motor for a series of different attachments, turning into a hole saw, a circular saw or even a true woodworking lathe. It essentially consists of a segmented commutator with brushes and is capable of developing high torque even under load. The motor drives a shaft whose end carries a rotating three-jaw chuck. Before use, the jaws are tightened around the shaft of a drill bit or another rotary tool. Tightening is performed with a toothed chuck key, an indispensable accessory always supplied with the drill. The key is inserted into the appropriate hole and meshes with the teeth on the chuck crown. This is because tightening the bit by hand would not make it firm enough, while using a key with serrated jaws would quickly damage the chuck itself.
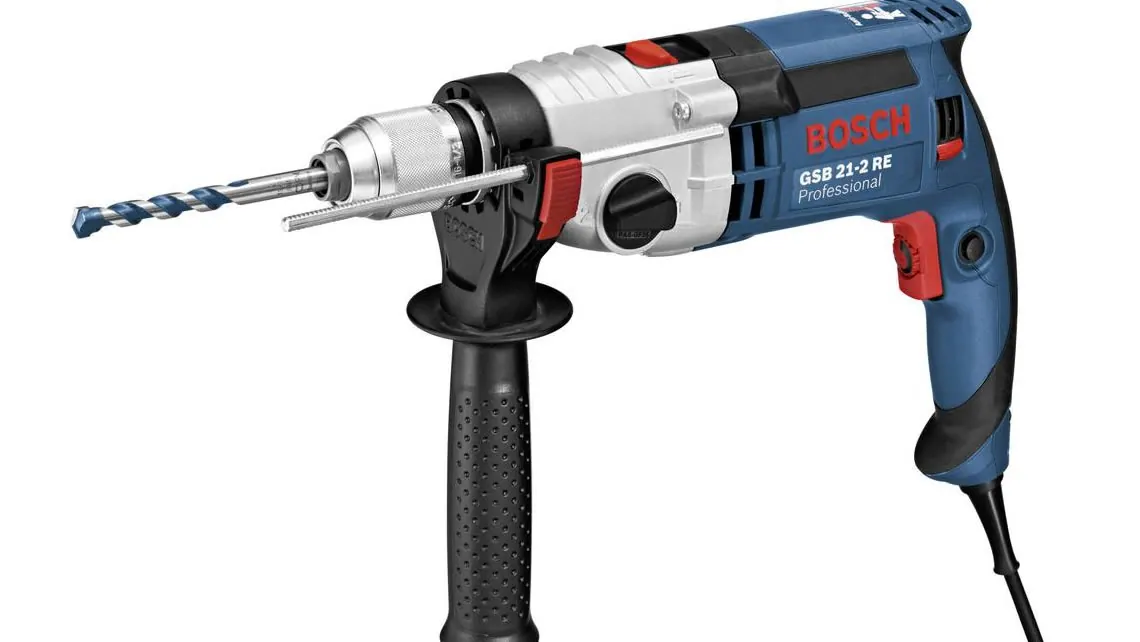
An electric drill usually has the shape of a pistol, with the motor power switch on its handle. In other words, pressing the switch starts the drill rotating and releasing it stops the drill. In addition, almost all models have a locking button on the side beside the switch. This allows the drill to continue operating even after the switch has been released. It is not used so often while drilling, but mainly when the electric drill serves as the motor for various machines, such as a router or a turning lathe.
Internal parts
The basic parts are located inside the electric drill housing: the chuck shaft is held by a strong rolling bearing protected from dust and requiring practically no lubrication. The motor shaft transmits rotation to the drill chuck shaft through a pair of gears and also carries a cooling fan. The handle contains a capacitor of a suitable capacity connected to the motor brushes, with the capacity depending on the motor characteristics. Its function is to reduce sparking between the brushes and commutator while the electric motor is operating. Otherwise, the sparking would interfere with radio and television receivers in neighbouring rooms, producing humming and lines across the screen. It has therefore become standard to fit interference-suppression capacitors not only to electric drills but also to all household electric appliances powered by a motor with a commutator and brushes.

The internal assembly of an electric drill, with the motor, transmission and chuck visible.
Types of electric drill
Single-speed drills
Shops today offer a genuinely wide selection of drills with major differences in their characteristics. The first and simplest model is the lightest and least expensive, constructed more or less as described above. Only the shape, weight—from one and a half kilograms to more than three kilograms—power—from 200 volts to more than 400 volts—and the dimensions of the drill bits and tools that can be secured in the rotating chuck vary. Most drills have an auxiliary handle beside the main handle. It is mounted on the side and secured to the housing, allowing the drill to be held and controlled better during use.
The basic characteristic of this group of electric drills is nevertheless that they have only one operating speed, which can differ considerably from model to model. Some run at 800 revolutions per minute, others at 1,800, 2,500 or even 3,000. These are therefore high-speed drills, which makes their range of use relatively limited.
Multi-speed drills
These drills differ from the preceding group in that they can rotate at two or four speeds. Their basic structure is the same as already described, but they are larger and heavier because the gearbox gears also have to fit inside the housing. The gearbox is operated from the outside by means of a suitable lever. This second group of drills is on average 20–30% more expensive, but offers a much wider range of applications precisely because the speeds can be adjusted. This means that they are suitable for drilling different materials, because a low speed is important for some and the opposite for others. A properly adjusted speed protects both the drill and its bits and produces holes much more accurately. A two-speed drill, for example, may rotate at 750 or 1,900 revolutions per minute, while a four-speed drill may provide 600, 850, 1,900 and 2,700 revolutions per minute.
Variable-speed and combination drills
The third group of drills has an electronic device that changes the chuck speed smoothly between its lowest and highest values, practically from 0 up to, for example, the maximum of 2,000 revolutions per minute. The device is engaged externally by a lever, whether the drill is running or switched off.
Combination models are also available. In addition to a gearbox, they have a continuously variable electronic speed controller. The dimensions, weight and price of the drill naturally increase, but at low speed the torque is higher, for the same motor power, than on a model with a speed controller but no gearbox. This high torque at low speeds is important for certain types of work.
Impact drills
Impact drills, also called vibration or hammer drills, have a mechanism that can be switched on or off as required. In addition to the chuck’s normal circular movement, it adds rapid straight-line movement backwards and forwards.
The tool therefore not only rotates but also strikes the surface being worked. Impact drills may be single-speed, may have a two- or four-speed gearbox, may have an electronically variable rotation rate, or may combine several speeds with an electronic speed controller. Accordingly, such models are on average heavier, larger, more powerful and certainly much more expensive. The impact mechanism is particularly useful when reinforced-concrete columns, staircases, solid-brick walls and stone walls have to be drilled. Such work is rarely done in most homes. A plug may need to be placed in a reinforced-concrete structure, but with a little more effort and patience this can also be done using a drill without an impact mechanism. Impact drills are consequently most often classed as professional tools. They are in fact used by tradespeople who install wall-mounted furniture, electricians, plumbers, gas fitters, construction workers who install stairs and railings, door and window frames, and even some modern sculptors.
A multi-speed impact drill, or better still one with a continuously variable electronic speed controller, can perform all the work of a drill without an impact mechanism when that mechanism is switched off, so hobby users can also operate it without difficulty. However, the higher price—which can rise substantially, even to twice that of comparable models without impact drive—would be difficult to justify through frequent use.

An impact drill while drilling a wall.
Rotational speed according to the material
The question of speed, meaning the number of revolutions per minute of an electric drill, is very important. We will try to demonstrate this with the example of drilling a hole using a twist drill bit. It is clear that the speed at which the edge of the bit removes chips from the material—the cutting speed—is proportional to the rotational speed of the bit and therefore the chuck, as well as to the diameter of the bit itself. In other words, at the same drill speed, the cutting or penetration speed is not the same for bits of different diameters. To obtain a good result, rotational speed must not exceed a certain limit. Otherwise the bit overheats, is tempered again, loses hardness and quickly loses its cutting edge, so it no longer cuts. Only a few seconds of operation at a somewhat higher speed can ruin a drill bit. An overheated bit whistles and smooths the bottom of the hole instead of deepening it, even when we persist and try to penetrate deeper by applying force, but without success.
The correct cutting speed depends on the material to be drilled. It is high for wood, aluminium and its alloys, and brass. The optimum speed is much lower for ordinary steel, lower still for special steels, and lowest for stainless steels, bronze and copper.
A fast, single-speed drill is therefore suitable for drilling wood and aluminium, while other metals can only be drilled with small-diameter bits so that the permitted critical cutting speed is not exceeded. This speed is not strictly fixed: there is always a broad tolerance, but it must not be exceeded. Drilling at a speed far below the optimum may be regarded as a certain waste of time, but the effort will pay off and the work will be done properly.
By contrast, working at a speed far above the optimum makes the task very difficult, if not impossible. It also damages the bits, requires additional effort and wastes time. Even if a hole is successfully drilled, it is usually poorly made: its diameter becomes larger than that of the bit, it is skewed or has an unwanted angle, the hole walls become grooved, the material overheats, and so on. It is therefore clear that even if an electric drill is intended only for holes in the most common diameters, from 2 to 10 millimetres, speed must be considered. Slower models should be chosen over faster ones unless we are certain they will be used only for wood and aluminium.
The same reasoning applies to other accessories that can be attached to an electric drill. Every tool—whether a milling cutter, abrasive disc, rubber wheel with a polishing bonnet, grinding stone, rotary wire brush or another tool—has its own optimum operating or rotational speed, which the manufacturer usually states on the packaging. The range of these speeds is broad but clear: a steel brush for removing old paint from a metal fence can be used at high rotational speed, while a rubber disc 10–12 centimetres in diameter for polishing furniture or cars must be used at a much lower speed. The issue is equally clear when a drill is used as the drive motor for various machine tools: each material-processing operation and each machine has its own optimum operating speed. In most cases the manufacturer states on the machine the rotational speed that produces the best effect. If we decide to buy a handheld electric drill, we should therefore bear in mind what has already been stated: a drill with adjustable speed, whether by a geared transmission or an electronic controller, is better because lower rotational speeds are more important than higher ones.
One might ask why so many single-speed models are available, sometimes with very high speeds of around 3,000 revolutions per minute. The answer is simple: the handheld electric drill for household use originated in the USA, a country where wood is of primary importance in construction. It was therefore logical to produce a tool for working wood in housebuilding and in joinery and carpentry in general. Models that allowed speed to be changed by means of a gearbox or electronic controller appeared only later, together with an increasing selection of drill accessories and the use of the drill as a drive motor for various machine tools. Hardly a day passes without the introduction of some new accessory that greatly expands the drill’s possible applications, so designers improve them continually, especially multi-speed drills. Added to this is the increasing penetration of such drills into the European market, where wood is not used extensively in houses and drills are increasingly employed for metalwork that requires lower rotational speeds.
Drilling with an electric drill
In almost every case, an electric drill can replace a geared hand drill that increases the rotational speed of the chuck. It cannot, however, replace a hand brace in some woodworking tasks, such as drilling blind holes or large-diameter holes. For drilling holes in walls to install plugs, except in reinforced concrete, solid brick and stone, an electric drill—especially one operating only at high speed—offers no major advantage over a hand masonry drill. It will not produce much saving in either effort or time, and clumsy handling can easily cause serious damage, such as breaking the plaster around the hole or drilling an oval or excessively wide hole. If an impact drill is used, and it has greater power, the work will certainly be much easier and faster. Even then, however, care is required because the bit of this type of drill penetrates easily and quickly. Without noticing how deep it has gone, we can damage water, gas or electrical pipes and all the conductors inside them. It is therefore better to use hand tools initially and to use an electric drill, especially an impact drill, only after gaining some experience.
Steel twist drill bits
An electric drill can be equipped with a very wide variety of accessories, greatly expanding the range of work it can perform. We normally begin, however, with rotary tools that are clamped directly into the drill chuck. We will of course first acquire drill bits. The two basic types of bit we must have are both tool-steel bits and so-called Widia bits, whose tips are made from even harder metals. We should obtain sets of both types in sizes that increase by half a millimetre, or even by a quarter of a millimetre if we intend to work exclusively in mechanics.
The first set of twist bits made from high-speed tool steel may be somewhat larger. High-speed-steel bits, although somewhat less expensive, quickly lose their edge and are not economical for home hobby work. This is because sharpening a bit is much more delicate than is generally thought, and it is difficult to do at home even with a bench grinder equipped with a device that holds the bit at the correct angle and allows it to be rotated slowly while the grinder sharpens it. Since this type of bit is inexpensive, it is more worthwhile to discard it than to sharpen it. When blunt, it can be retained for drilling wood, which generally does not require especially sharp bits. It can also be used with a hammer for drilling ceramic tiles.

A set of twist drill bits arranged by diameter.
Widia drill bits
The second set, consisting of so-called Widia bits—the name comes from one of the first companies to market cutting tools whose cutting edges had hard-metal plates welded onto them—does not need to contain as many sizes as the first. Hard metal is a synthetic material, a mixture of metal grains and powder heated under pressure until a compact alloy is obtained. It contains very hard carbide, tungsten or titanium grains together with another metal, most often cobalt, which acts as a binder. Two tiny plates of these hard metals are welded to the two working edges of the drill-bit tip. The cutting edges therefore become blunt only after a much longer period than edges made from even the best tool steels. Widia bits also tolerate higher drill speeds because they are much more resistant to the high temperatures generated during drilling. They are, of course, much more expensive than high-speed-steel twist bits.
Drilling reinforced concrete
Widia bits allow us to drill holes at home in reinforced-concrete columns or ceilings. This should be done carefully in two or three stages. First, make a smaller-diameter hole, for example with a 3 mm bit. Then drill it again with progressively wider bits, once or twice, until the desired diameter is obtained, up to a maximum of around 10 mm. For larger holes, an impact drill and a core bit should be used; the latter is hollow inside, with teeth arranged around the face of its crown.
Tradespeople generally frown when drilling reinforced concrete is discussed, because the bits are certainly damaged and can no longer be used for metal, while the bits themselves can also break. There is also a risk that the drilled holes will be eccentric, oval or slanted. Reinforced concrete is drilled relatively rarely at home, however, and the task can usually be completed using the procedure described and a little patience.
Rotary tools and accessories
Rotary tools with a shaft for securing in the electric drill chuck
There are numerous tools that differ from drill bits and are therefore suitable for other jobs, but which are secured to the drill chuck in the same way by means of a steel shaft carrying the tool. These are primarily abrasive tools of different shapes and dimensions, used to remove scale from metal and grind welded seams. They also include milling cutters and metal brushes whose wire bristles are set parallel or radially in relation to the axis of rotation and are used to remove paint and rust from metal. There are also rubber discs to which abrasive material is attached for finishing metal surfaces more finely than with metal brushes, polishing bonnets for metal, and so on. It is not possible here to provide a complete survey of all the different rotary tools that an electric drill can use. Well-equipped hardware stores nevertheless have catalogues of these tools, where it is easiest to find what is needed for a particular job and obtain information about newly manufactured products.

Examples of rotary brushes, grinding stones and a rasp disc.
Flexible extension shaft
One special accessory—or, more precisely, two accessories together—makes it easier to use the various tools described above and to work in a more favourable position. They are a suitable stand to which the drill is secured, with each manufacturer offering one among the accessories for its drill models, and a flexible transmission: a rotating shaft with a handle and a chuck like the drill chuck, into which any of the rotary tools mentioned can be fitted. The drill can thus be fixed in place while the tool connected by the shaft is positioned in the best location for the work. Such shafts are produced in various lengths, even exceeding one metre.
Removing material from a fence post, smoothing part of a piece of furniture or polishing metal surfaces is much easier with this equipment than when the entire drill has to be held in the hands and moved into various positions. The important point is that the stand holding the drill must be firmly secured.

A drill on a stand with a flexible shaft for changing the working position.
Additional accessories for an electric drill
Shops offer an increasing variety of accessories for electric drills that sit somewhere between attachments and separate, specialised machine tools. For example, a screwdriver with a spring and friction clutch can be purchased and attached to the electric drill in place of the chuck. When pressed, the screwdriver begins to turn—a low-speed drill is required—because the two clutch elements press against each other and transmit rotational movement from the electric motor to the screwdriver tip. The harder it is pressed, the faster the screwdriver turns. The same device can also be fitted with socket wrenches and used to tighten bolts and nuts. This tool saves a great deal of time when a large number of screws have to be removed or installed. A screw is initially positioned by hand, but the subsequent long and tiring turning is performed with the electric drill.
Another accessory, placed between the drill and the socket, allows the drill speed to be reduced and adjusted. It is a device that changes the voltage using strips. In this way, either a drill or another machine with an electric motor can be turned into a variable-speed model.
There is also an accessory mounted on the drill chuck that collects chips or dust during operation, for example when working on a wall or ceiling. Electric-drill accessories also include adaptors that allow tools requiring a larger or different chuck to be mounted on the drill chuck. Another type of tool is a propeller that enables the drill to be used as a mixer for wall paint, varnishes and various mixtures of moderate density. As a last resort, if thoroughly cleaned, it can even serve as a mixer in the kitchen.
Since ever newer specialised tools and accessories are continually being placed on the market, it is worthwhile to follow these developments occasionally by visiting specialist shops.

An electric drill on a vertical stand with a lever for lowering and raising it.
Drill stand
In mechanical work, holes often have to be drilled at precisely defined positions or in small objects. Manufacturers of handheld drills therefore supply special stands with a lever for lowering or raising the drill. The lower part of the stand forms a small table on which the workpiece is placed. Before work begins, the workpiece must be secured with a flat clamp. Together, the stand and drill form a bench drill, a machine indispensable in every mechanical workshop. In workshop jargon it is called “sensitive” because the pressure of the drill bit on the workpiece can be felt and finely controlled through the lever, so the operator knows exactly whether the bit is penetrating correctly.
Related topics: small saws and grinders, woodworking machines and tools, sanding machines, production of wooden windows and doors and processing services.