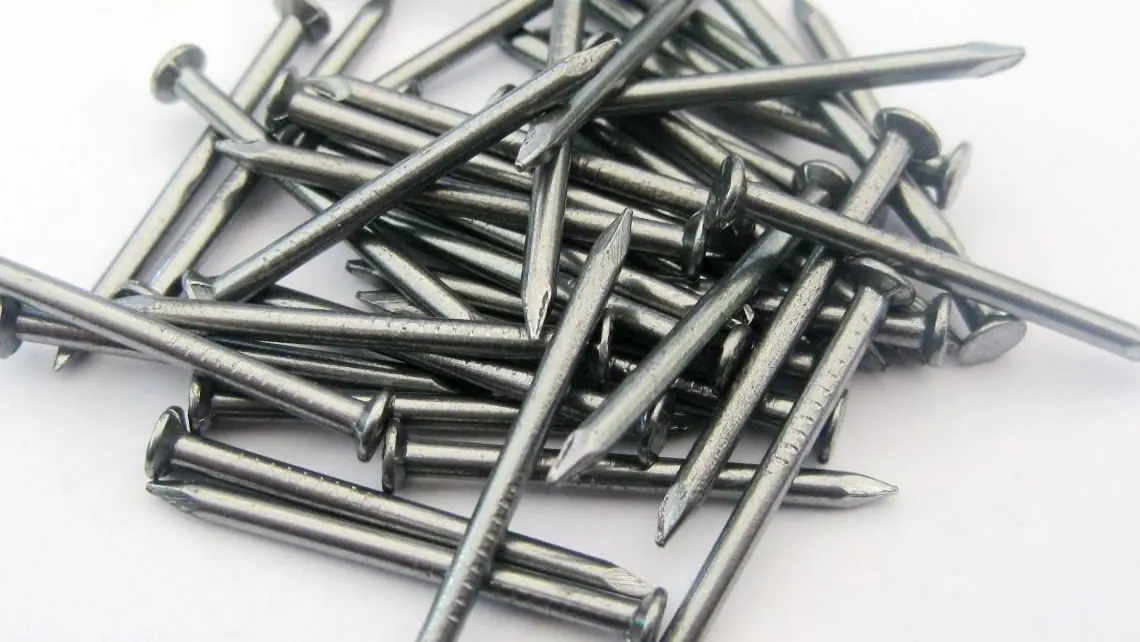
Driving nails is the most common and seemingly the simplest job. Naturally, this job also has its particular features.
How to prevent the wood from splitting
For example, a nail with a cut-off or “blunted” point does not split the wood by forcing its fibres apart, but cuts and tears them (Figure 1, part 1). Thin boards that are prone to splitting are nailed with such nails. This is the easiest way to drive a nail without splitting the wood.
If several nails are placed in one row, make sure that they are not on the same line, because driving nails into the same line of fibres would split the wood. The nails should be driven in a zigzag pattern or in three rows (Figure 1, part 2).
When joining two pieces of wood, it is also useful to know that diagonally driven nails can “pull” the pieces together. Driving nails diagonally, alternately in one direction and then the other, prevents the pieces from moving relative to one another (Figure 1, part 3).
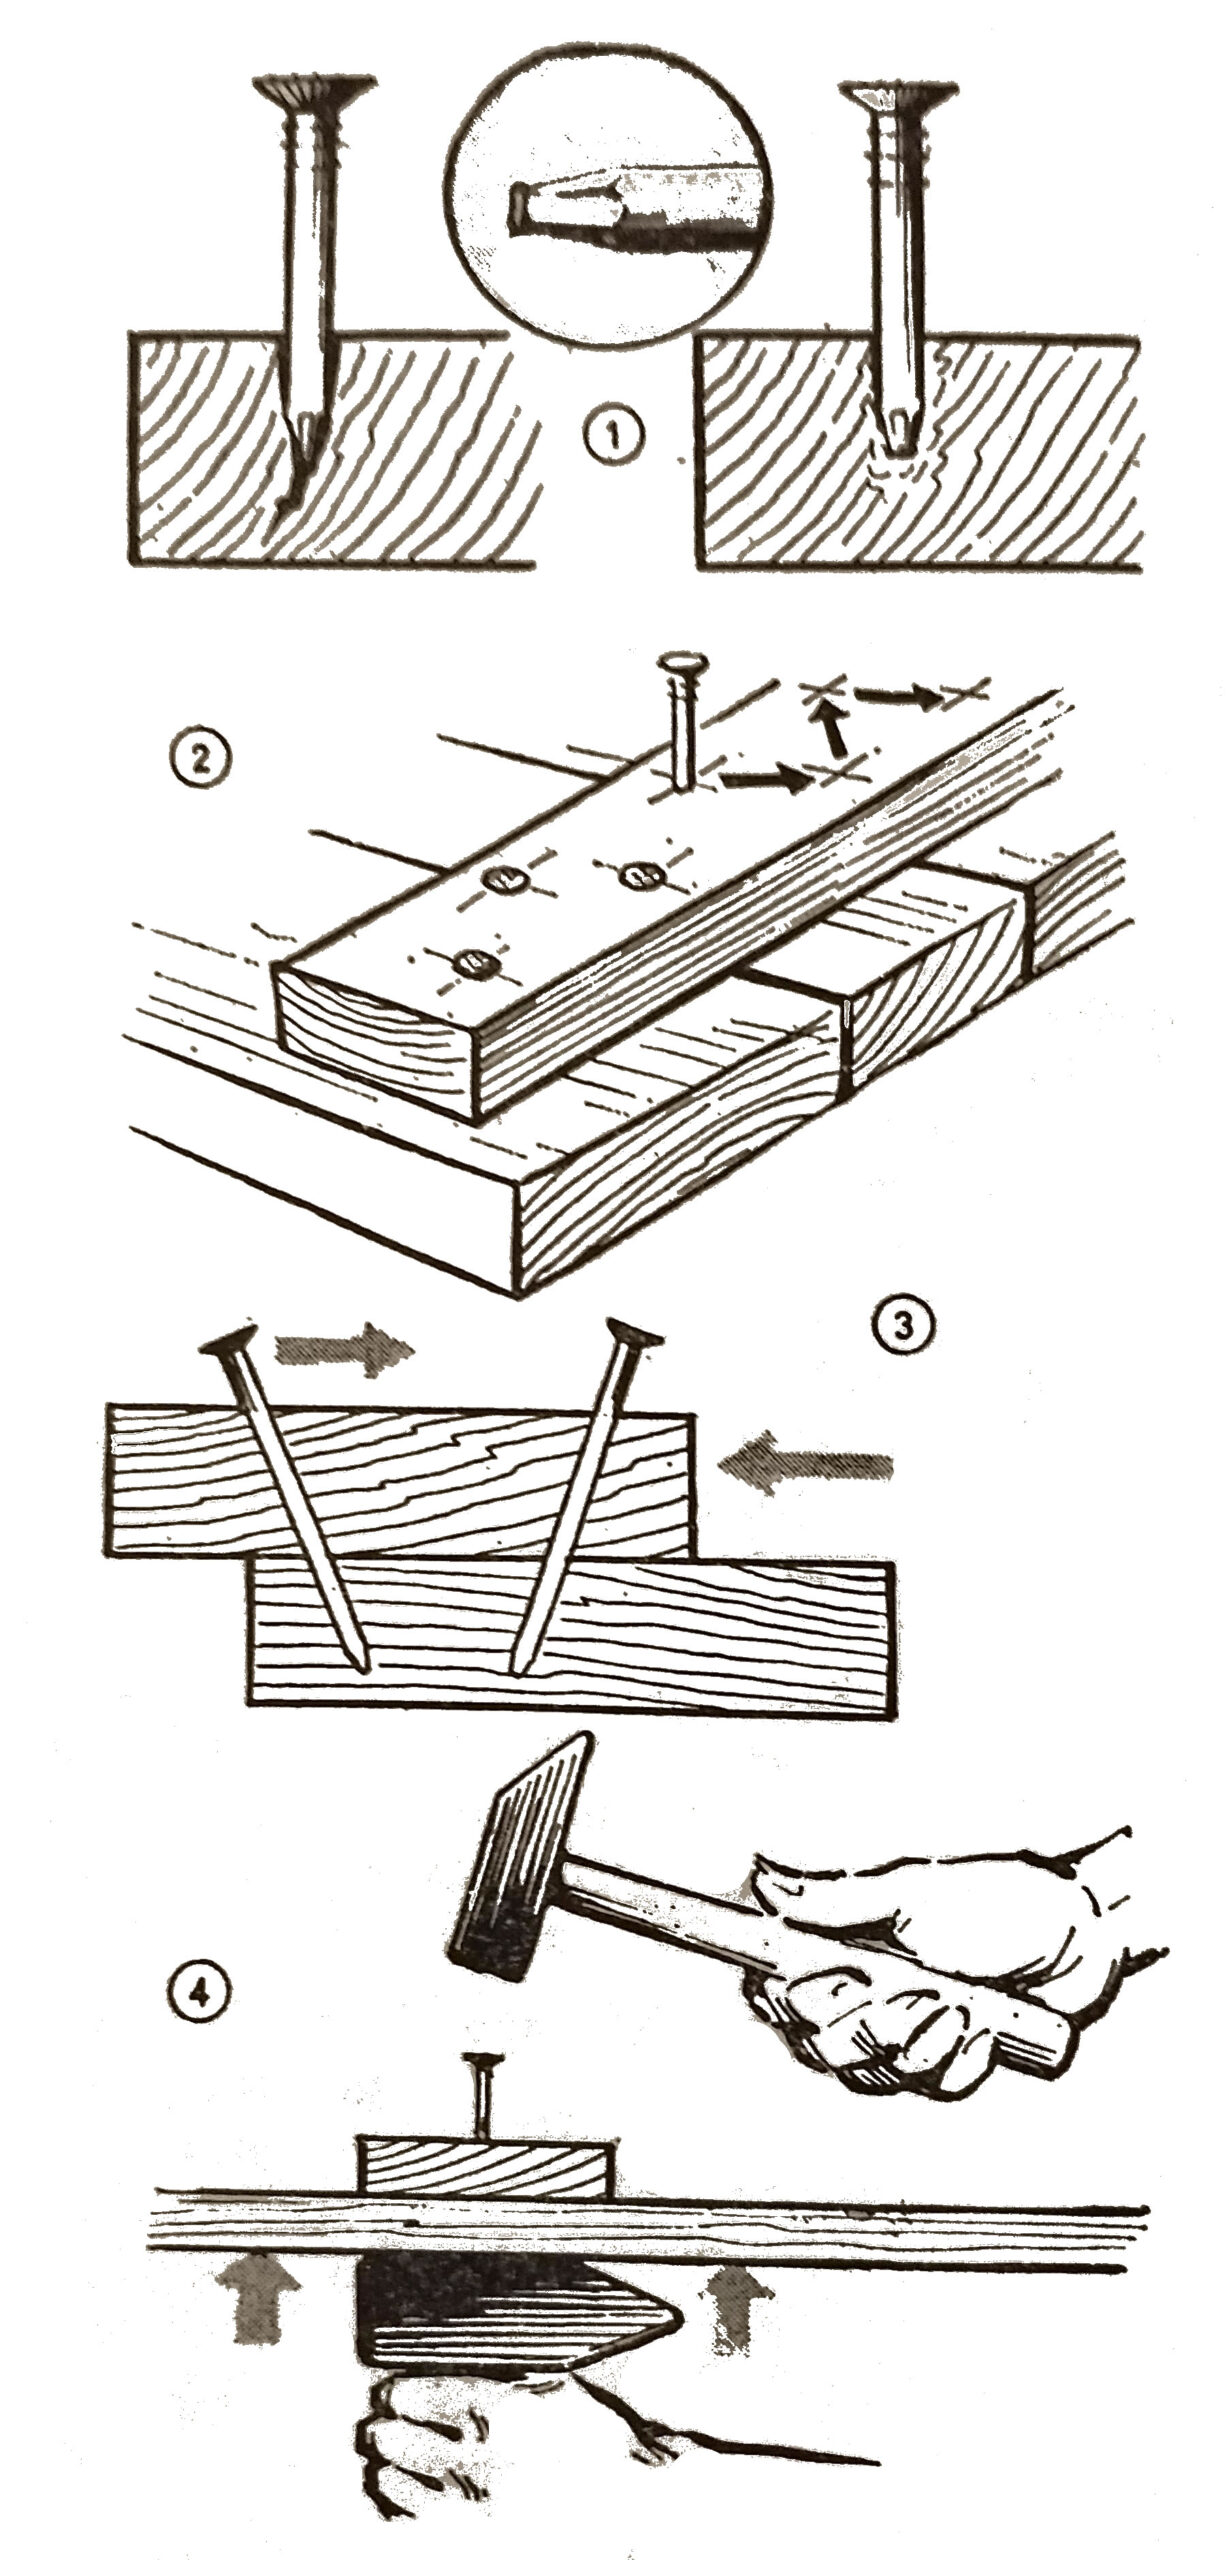
Figure 1: Blunting the point, arranging and directing the nails, and supporting the board.
Supporting the board and directing the blow
When driving a nail, it is very important to support the opposite side of the object. If a board is held in the hand or supported away from the nailing point, it bends elastically and yields under the blow. A nail driven in this way is liable to bend and is difficult to drive. If a nail is driven through two boards, the boards will not be pulled sufficiently together by the nail (Figure 1, part 4).
A hammer is a good means of support when driving nails, and it must be at least three times heavier than the hammer used for driving. The support should cover a larger surface, not only one point on the board, and should be as close as possible to the nailing point. If the point of the nail does not pass through the board, the support should be placed directly below the nail.
If several nails are being driven and loosening of the nails already driven is to be prevented, the point of a driven nail should be bent through an angle of 30–45° by striking the lower part of the nail with the sharp part of the hammer.
Start driving a nail with light setting blows (Figure 2, part 1), striking from the wrist and holding the hammer slightly above the end of the handle. After the first light blows, check whether the nail is moving in the intended direction. Only blows delivered normally to the nail head can be expected to make the nail enter the material straight without bending.
The most common beginner’s mistake is a mismatch between the direction in which the hammer moves and the axis of the nail. If the nail is travelling in the wrong direction but has not bent, it can be redirected with small blows at the point where it enters the material.
An inexperienced beginner should not work with used, straightened nails. Saving material is commendable, but in this case it does not achieve the aim.
Once the initial blows have set the nail, nailing can continue. Hold the hammer near the end of the handle and, with the upper part of the head vertical, strike from the elbow, raising it to approximately 45°. It is useful to measure the distance from the elbow to the nail head. In this way only the direction of the hammer has to be maintained, while the correct distance follows naturally.
The final blow should be judged while the nail head is still a considerable distance from the board, so that the last blow also drives the head into the board (Figure 2, part 1/a). If only a small part of the nail remains exposed, an inexperienced beginner may damage the wood surface with the final blow.
Bending the nail point and protecting the fingers
An old triangular file can be used to bend the point of a nail that has passed through the other side of the board. The part of the nail to be bent must be 1.2–2 times as long as one side of the triangular file.
Place the file beside the nail and use light sideways hammer blows to bend the end onto the file. Then roll the point over the upper edge of the file. Drive the resulting hook into the board with two or three hammer blows (Figure 2, part 2).
Anyone concerned about their fingers should use a nail guide. A worn pair of flat-nose pliers can serve very well for this purpose (Figure 2, part 3), allowing the positioned nail to be driven without fear of hitting a finger.
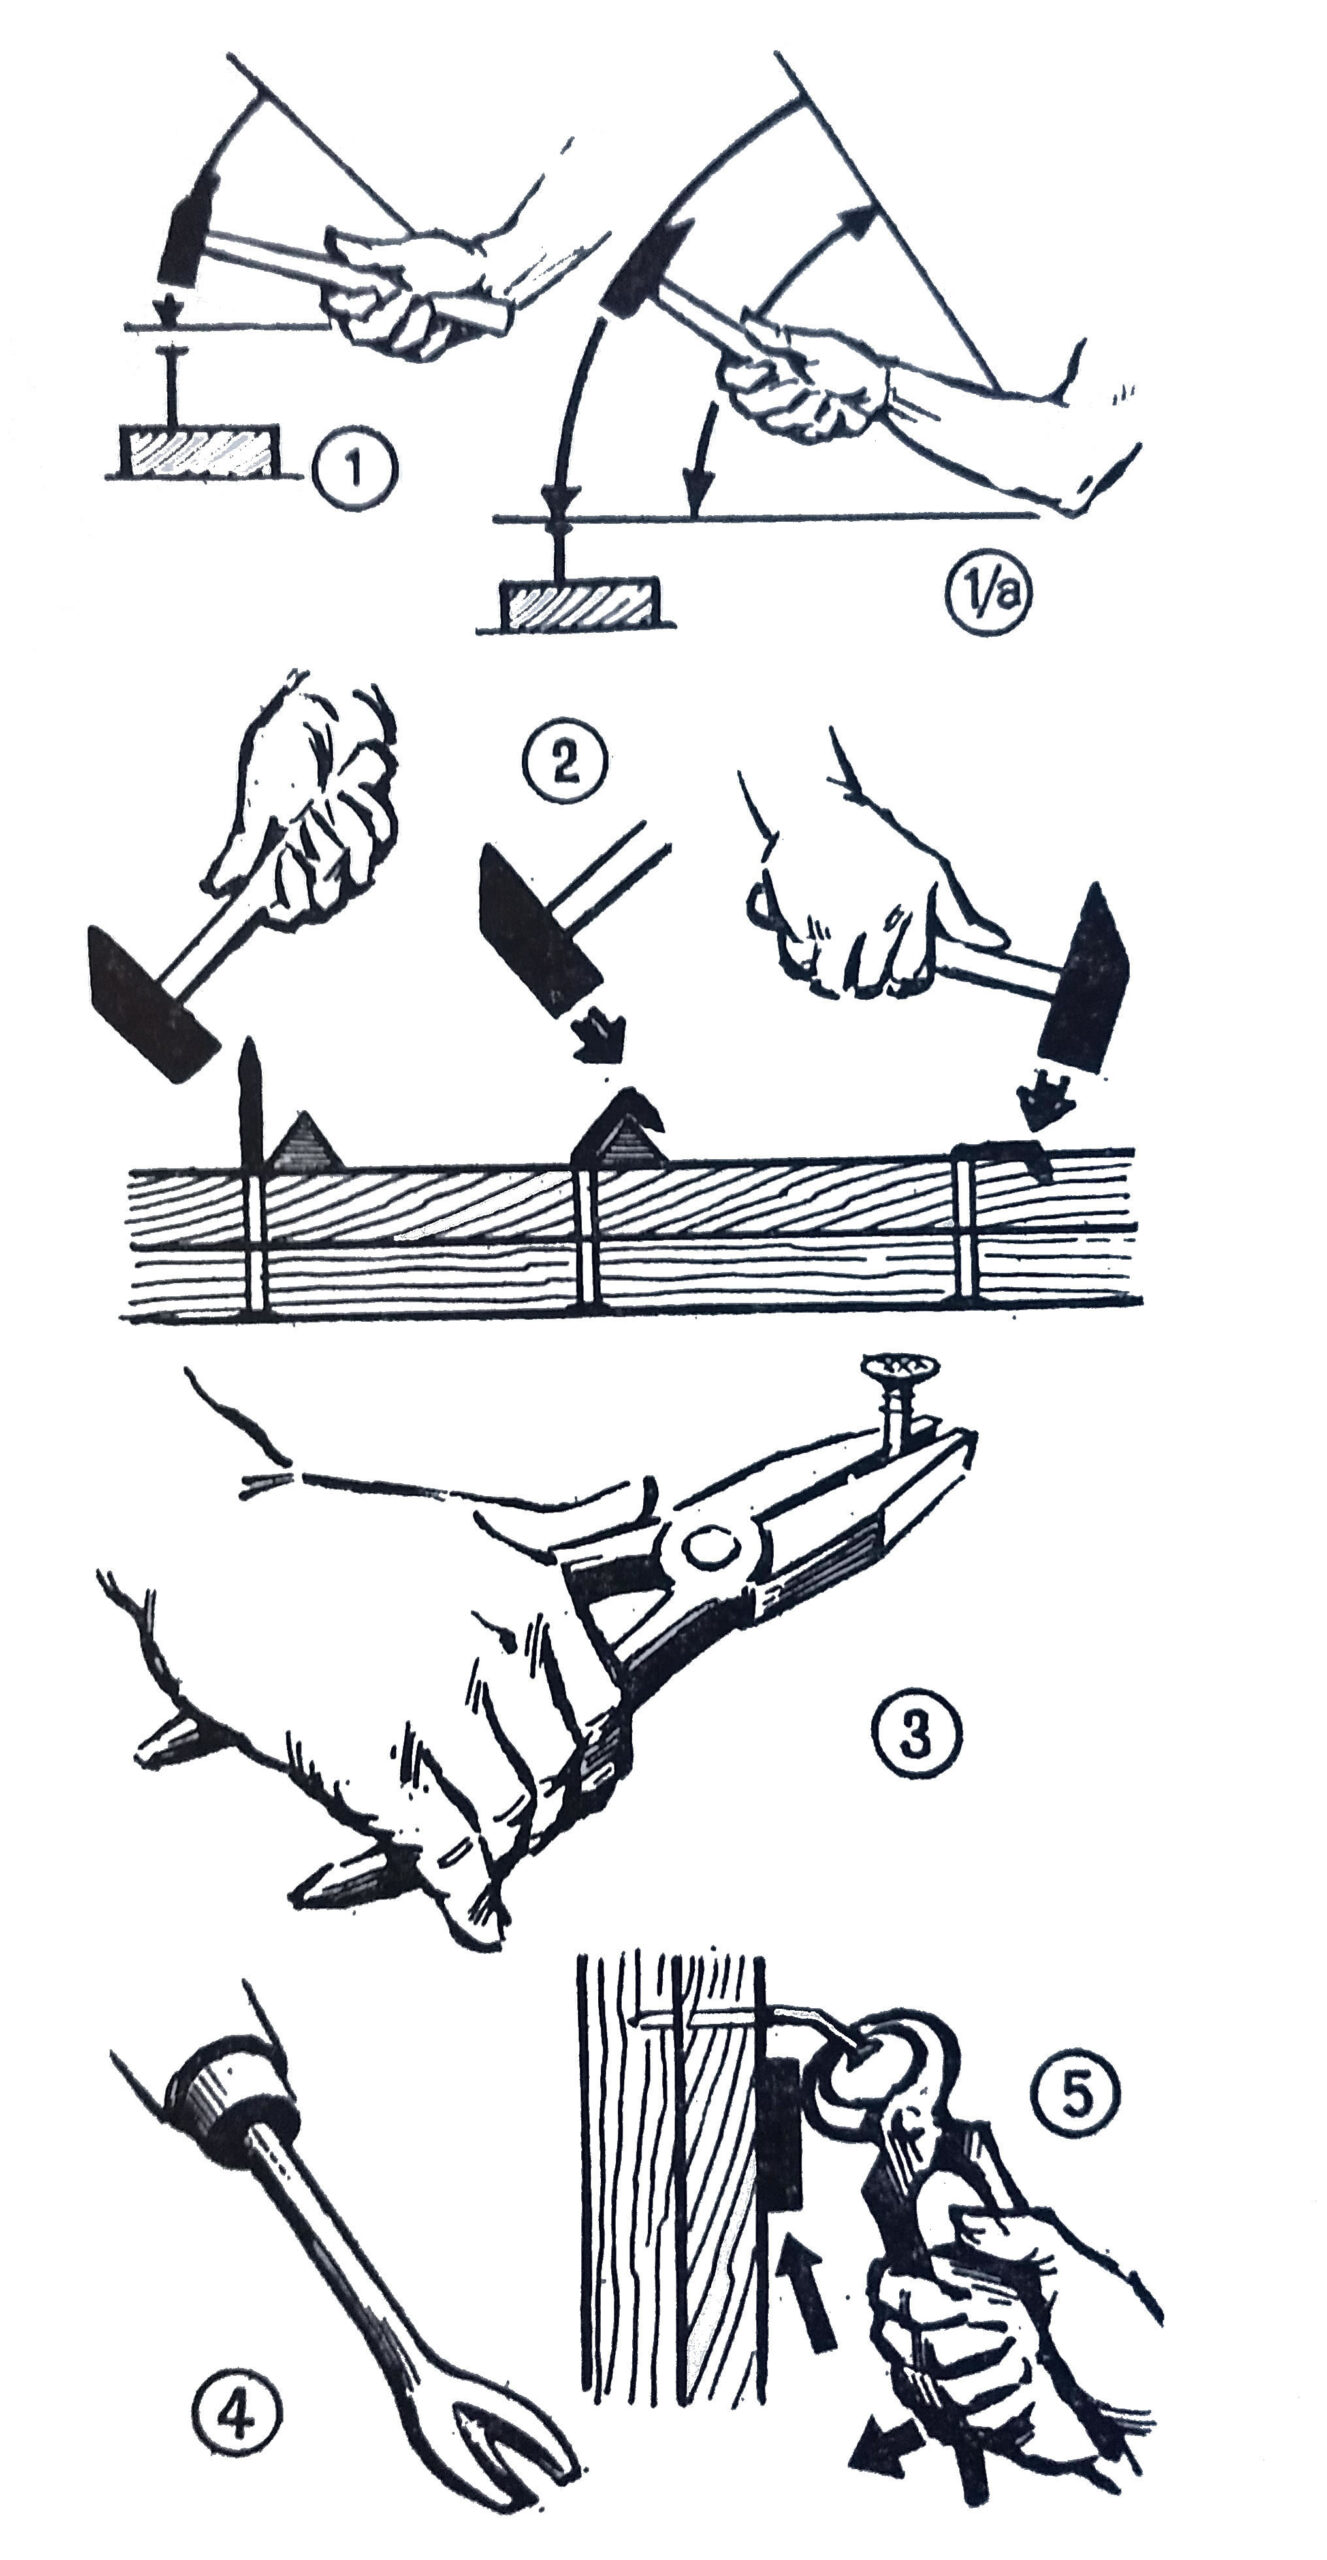
Figure 2: Driving, bending and removing nails.
Removing nails
Craft work often begins not by assembling a structure from new material, but by dismantling an old structure in order to obtain material for a new job. In most cases, this work involves removing driven nails.
The first operation is to straighten the nail point. For this purpose, make a tool similar to a screwdriver with a bent end, which can grip the bent end of the nail with minimal damage to the wood. It is no use striking the nail point until it has been completely straightened, because that would merely bend it again. Once it has been fully straightened, a short hammer blow on the point can move the nail far enough for pliers or a nail-removing tool to grip it beneath the head on the other side. The bent screwdriver described above can serve as the removal tool if its point is filed into a V shape (Figure 2, part 4).
Use the nail-removing tool as a lever by pushing its V-shaped lower end beneath the nail head. Let the curved lower part of the tool rest on the wood and press the longer, handled end downwards.
Two rules are important. The V-notch should enclose the nail shank as closely as possible so that the lower lever arm is as short as possible. Place a metal or wooden pad beneath the “elbow” of the tool to avoid damaging the wood surface. Once the nail starts to move, gradually increase the thickness of the pad to obtain a better pulling force.
Ordinary pliers can also be used to remove nails (Figure 2, part 5). It is better to use them as a lever than to pull or jerk the nail towards the body. A suddenly released nail and the pliers can fly with great force and cause an accident. Particular care should be taken never to jerk the nail towards the head.
Basic nail types and markings
The most important types shown here are: a narrow countersunk-head nail for wooden wheels, the familiar flat-head nail, a half-round-head nail, and a double-pointed nail for door handles, used to secure the handles against falling out (Figure 3).
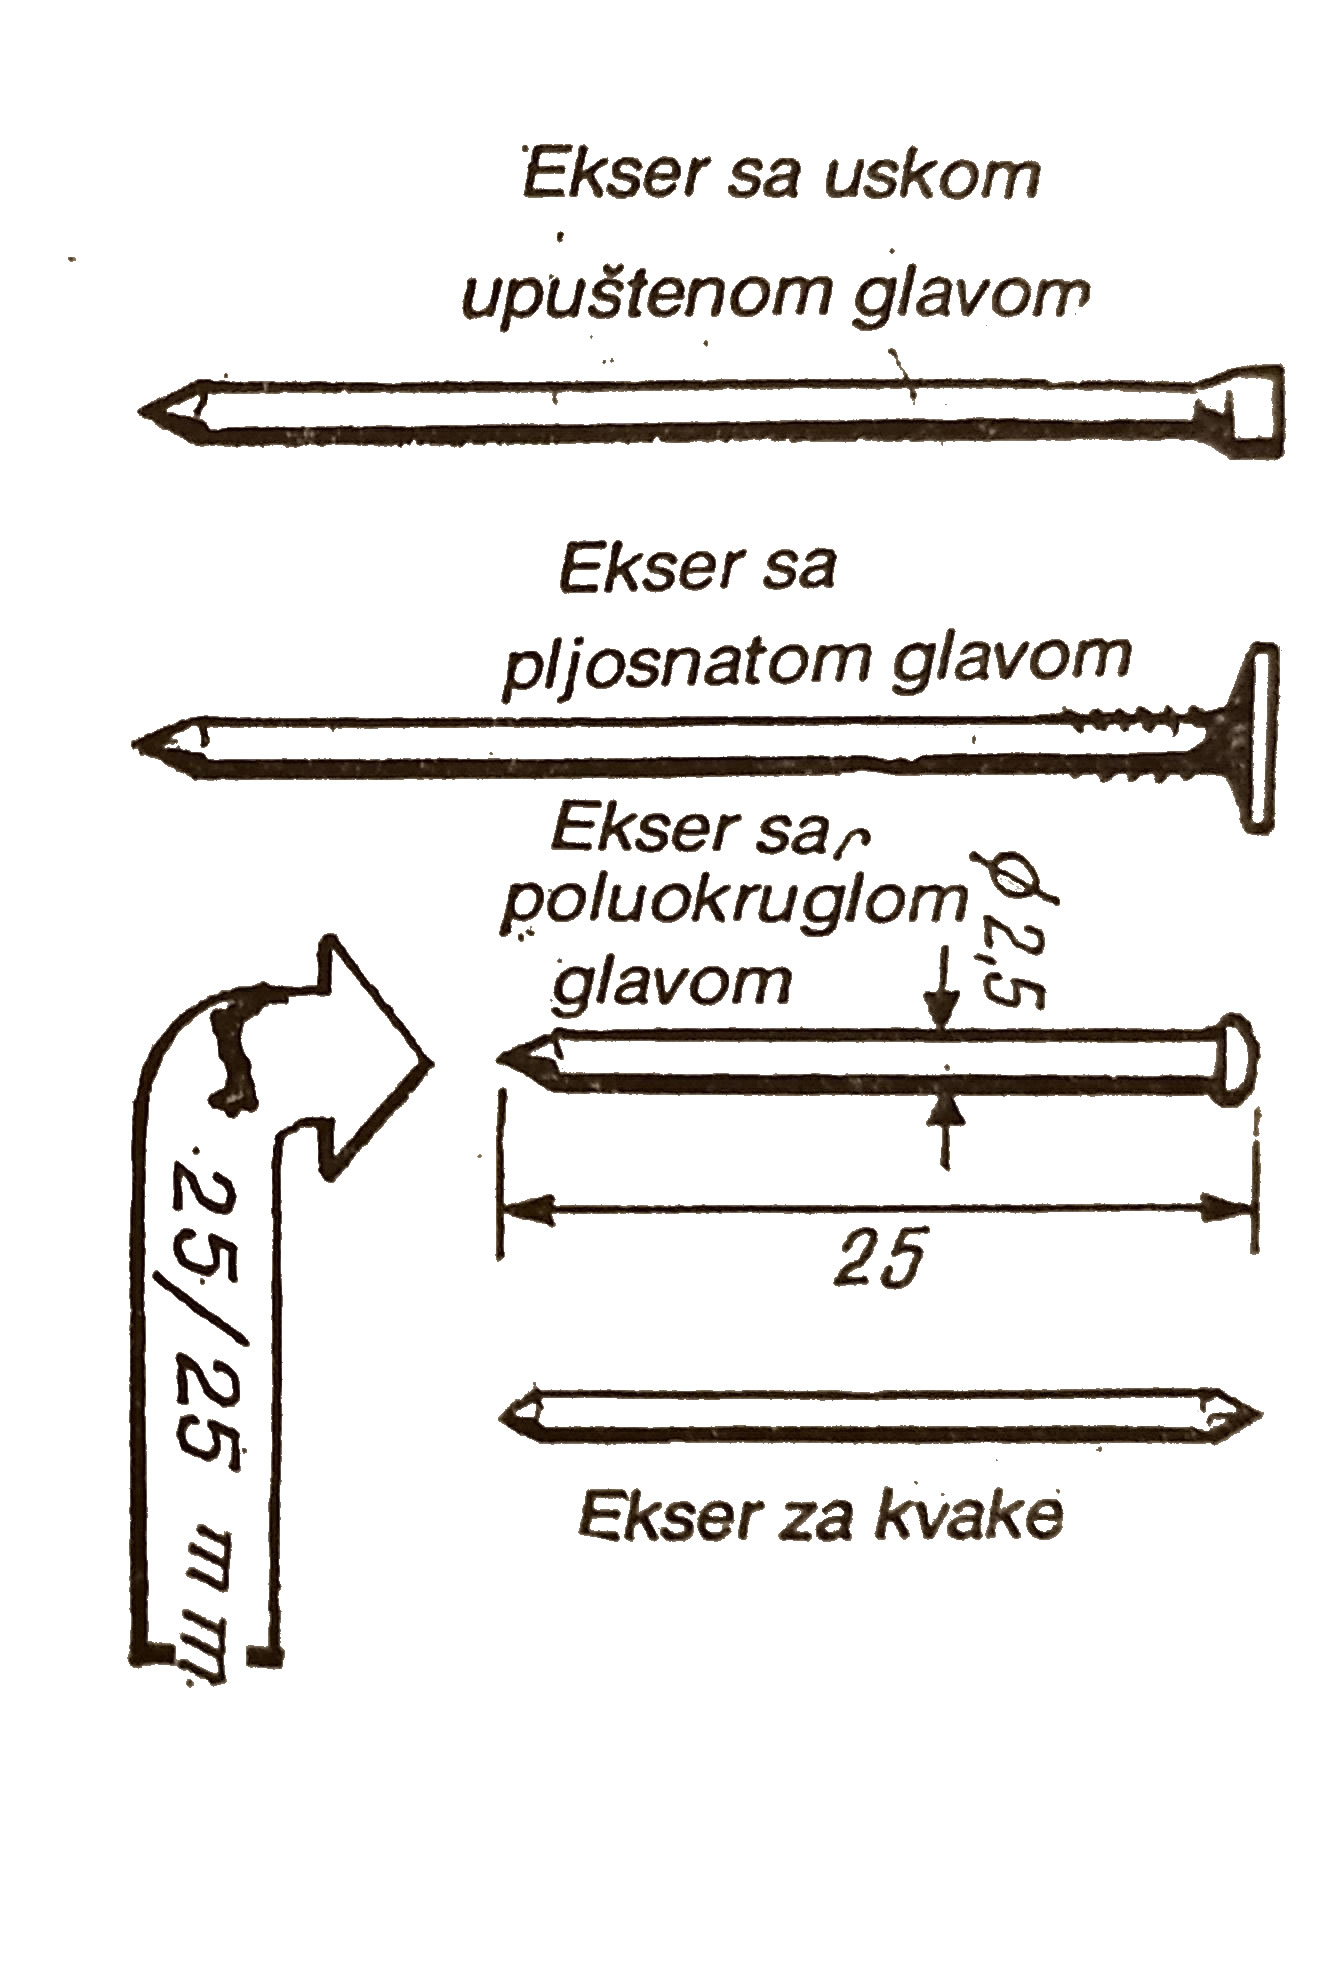
Figure 3: Important nail types and an example of dimension marking.
A common characteristic of all nails is that their dimensions are given as a product, for example 25×25. The first number indicates the diameter of the nail shank in tenths of a millimetre, and the second the length of the shank in millimetres. The example denotes a nail 2.5 mm thick, or 25 tenths of a millimetre, and 2.5 cm long, or 25 mm. Longer nails usually also have a greater thickness.
Nails are sold by weight rather than by the piece. For information, the weights of 1,000 nails and the package weights are:
| Nail marking | Weight of 1,000 pieces | Package |
|---|---|---|
| 10×10 | 0.7 kg | 1 kg |
| 20×40 | 1.0 kg | 2 kg |
| 31×70 | 4.35 kg | 5 kg |
| 50×130 | 20.80 kg | 5 kg |
| 70×200 | 61.50 kg | 5 kg |
The weight of countersunk-head nails differs only slightly from that of flat-head nails, while half-round-head nails and door-handle nails are somewhat lighter.
Before considering fasteners in joinery and carpentry structures, it is necessary to become more familiar with one of the most frequently used elements: the nail. It is handled almost every day, for example when fixing pictures to a wall, upholstering, or fitting locks and hardware. It is important to buy the appropriate nails for a particular material and job.
Making the correct choice requires knowledge of the trade name, dimensions and nail type. The dimensions and material used to manufacture nails are specified by standards.
A small catalogue of nails
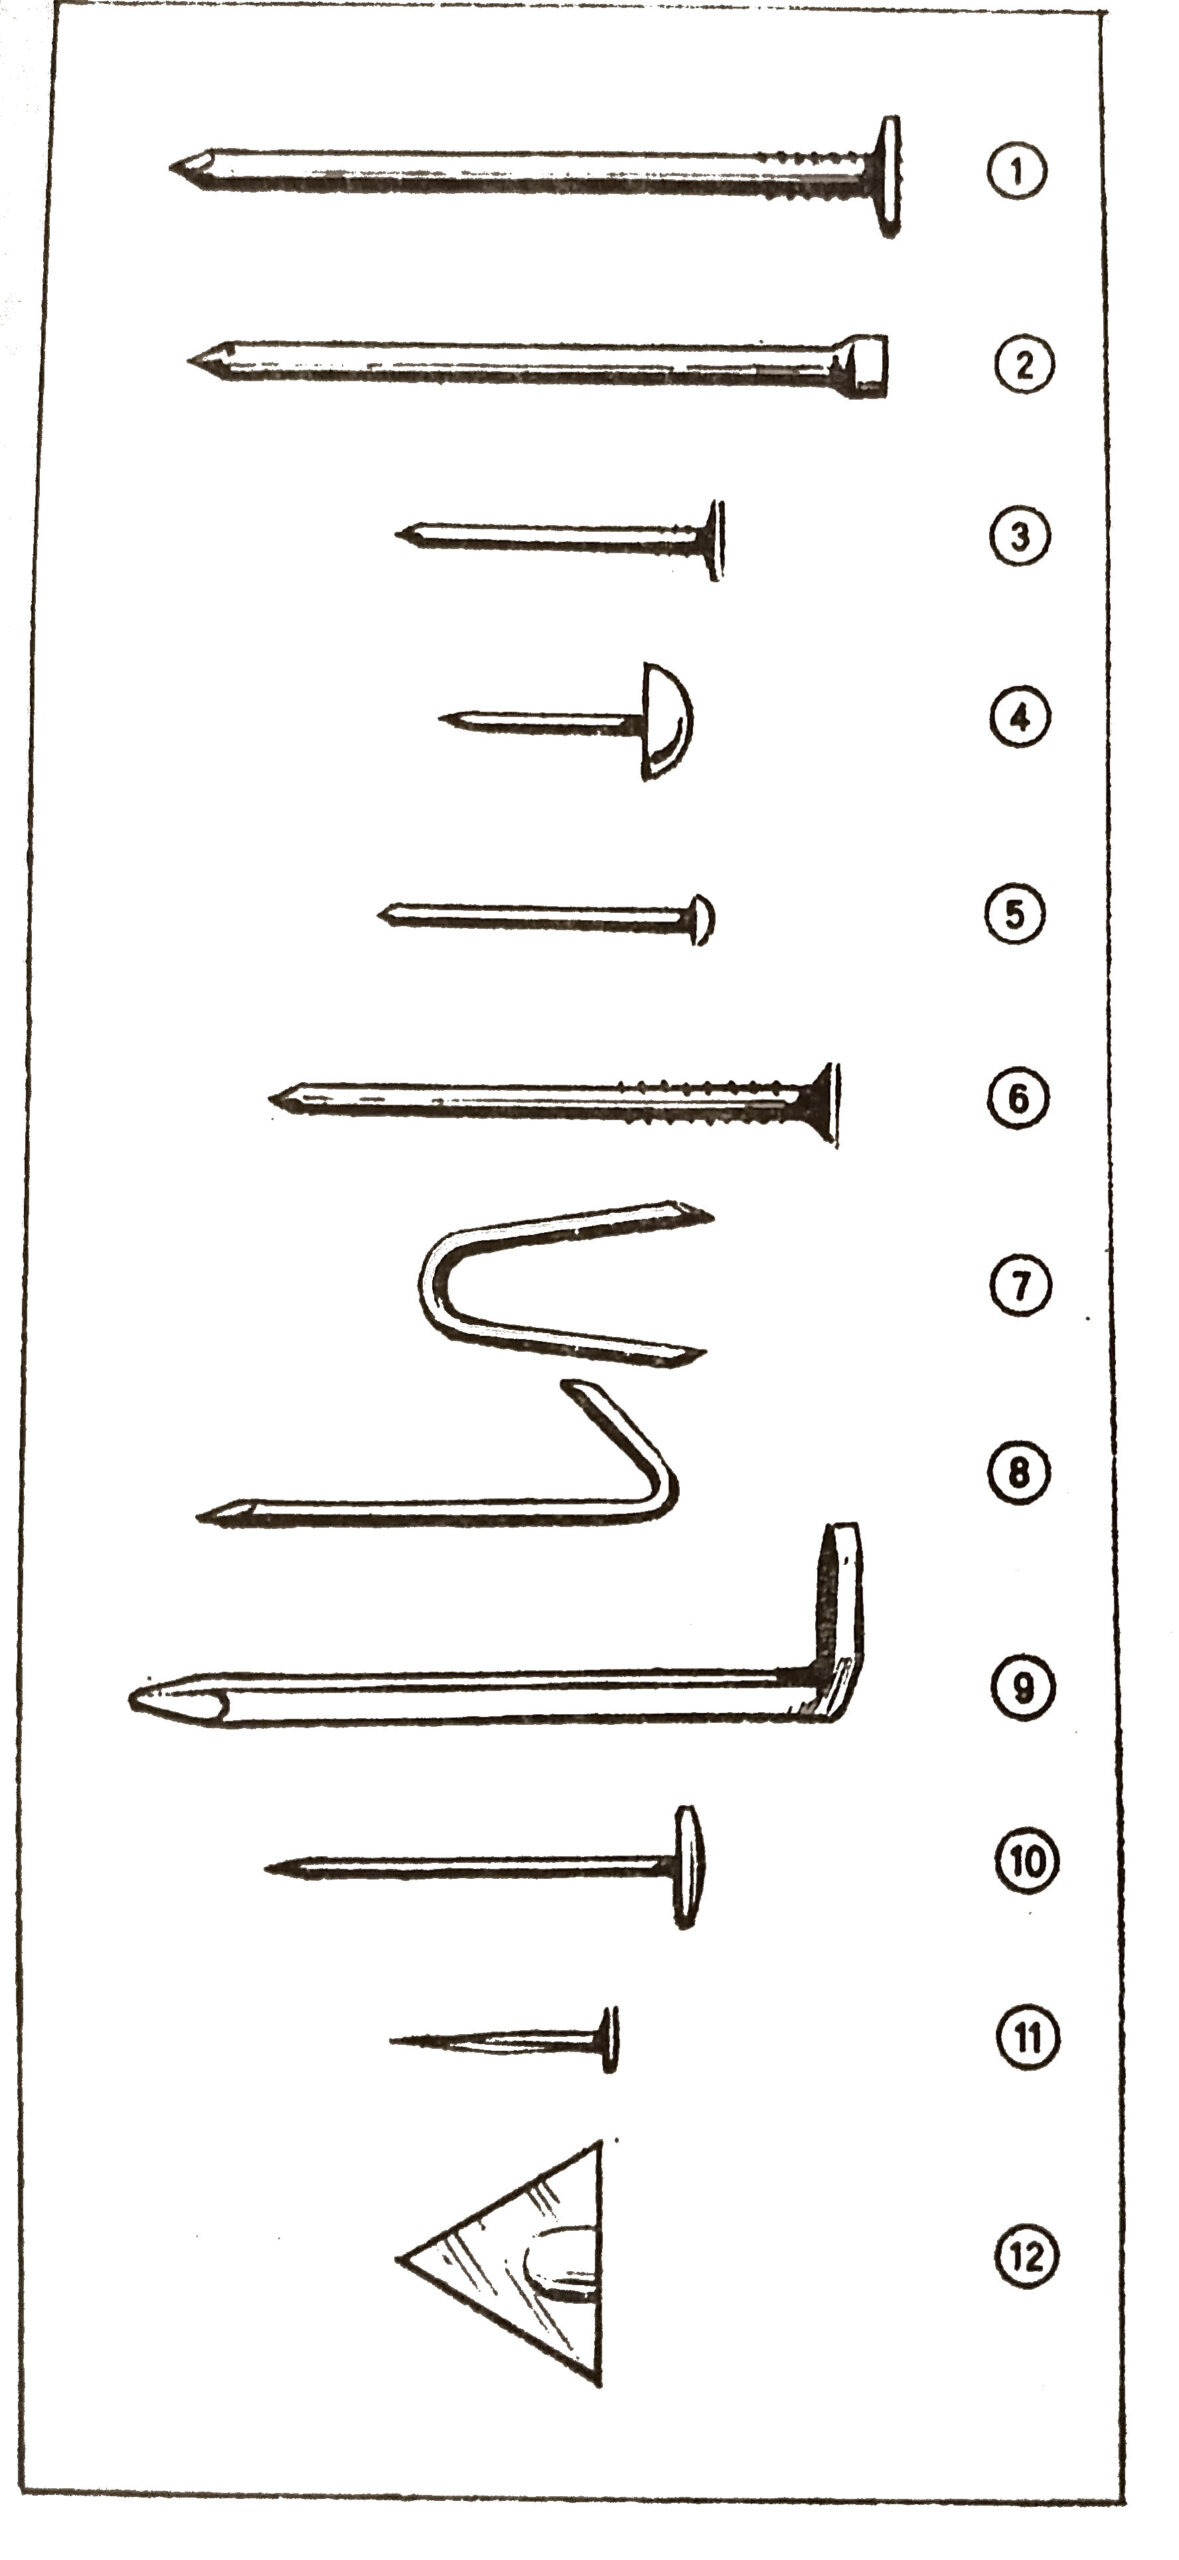
Figure 4: A small catalogue of nails.
-
A flat-head nail has a serrated head in larger sizes so that the hammer does not slip while it is being driven. It can be used for all wood materials, particularly for nailing boards and battens used in boxes and shelves.
-
A narrow countersunk-head nail has a smaller and slightly cylindrical head, similar to the head of a pin. It is mainly suitable for joinery, such as furniture and flooring, because the head enters the material and a plane can pass over it.
-
An upholstery nail is usually grey or steel blue and is used to fasten fabrics in upholstery work.
-
A decorative upholstery nail is used to decorate fabric edges and borders. It is sold in four finishes: nickel-plated, yellow, red-oxide and black.
-
A lock nail is made up to a length of 20 mm with a half-round head. It is used to fasten locks on windows, doors, desks, cupboards and similar items.
-
A hardware nail has a serrated shank for a better hold. It is used to nail corner reinforcement to windows and rails to thresholds. Its countersunk head does not project after it has been driven.
-
A U-shaped nail is dimensioned like other nail types, for example 18×18, except that its second number denotes the combined length of both legs. It is used to fasten springs and wires to wood.
-
A stucco nail is made in the size 2×30. In addition to stucco work, it is used for temporary fastening of thinner wires and panels.
-
A hook nail has a flat hook and a square shank. It is needed for hanging objects such as mirrors, pictures and shelves.
-
A steel picture nail has a flat, round head that may be covered with a brass cap. It can also be driven into a brick wall.
-
A shoemaker’s nail is specified only by its length of 8–12 mm. It is used mainly in industry, but is also needed for shoe repairs and for nailing smaller objects.
-
A glazing nail is a triangular piece of sheet metal. It is used when glazing windows, doors and pictures with wooden frames. A putty knife can pass freely over it (Figure 4).
Nails or wood screws
Nails have several disadvantages: driving them requires specialist knowledge, removing them damages the wood, and a nail becomes loose when the wood dries. It is therefore better to use wood screws.
Related topics: wood defects, wooden windows and doors.