Archival content and security: the text preserves the historical description of locks, keys and hinges. It does not constitute advice on modern security systems, insurance conditions or making duplicates without authorization. Only work on locks and keys when you have access rights; hire an authorized locksmith or service for security, fire, evacuation and electronic locks. Springs, sharp edges, files, saws, flames, solvents and shavings can cause injury or fire.
Today, Savo Kusić is focused on wooden windows, wooden-aluminum windows, custom windows, doors and requests for quotation. This article remains a historical home manual and does not constitute an offer of locksmith or locksmith services.
Damages and their repair
There are small, everyday jobs in the household: repairing the floor, replacing broken glass or fixing problems with the door. The original text discusses them in order from simpler to more complex. In the case of a lock, it is first important to determine whether the cause is the mechanism itself, improper fitting of the door, a worn hinge or a damaged cylinder.
Types and parts of a mortise lock
The historical handbook distinguishes between mortise, mortise, and mortise locks, noting that mortise locks are usually fitted to residential doors.
They are marked on the drawing: 1. key hole, 2. lock tab, 3. hook, 4. handle tab, 5. cylindrical shell, 6. handle place, 7. lock housing, 8. springs and pins and 9. final edge. The display also includes the tightening screws, and in the case of safety locks, the gearbox; the arrangement is shown in figure 1.
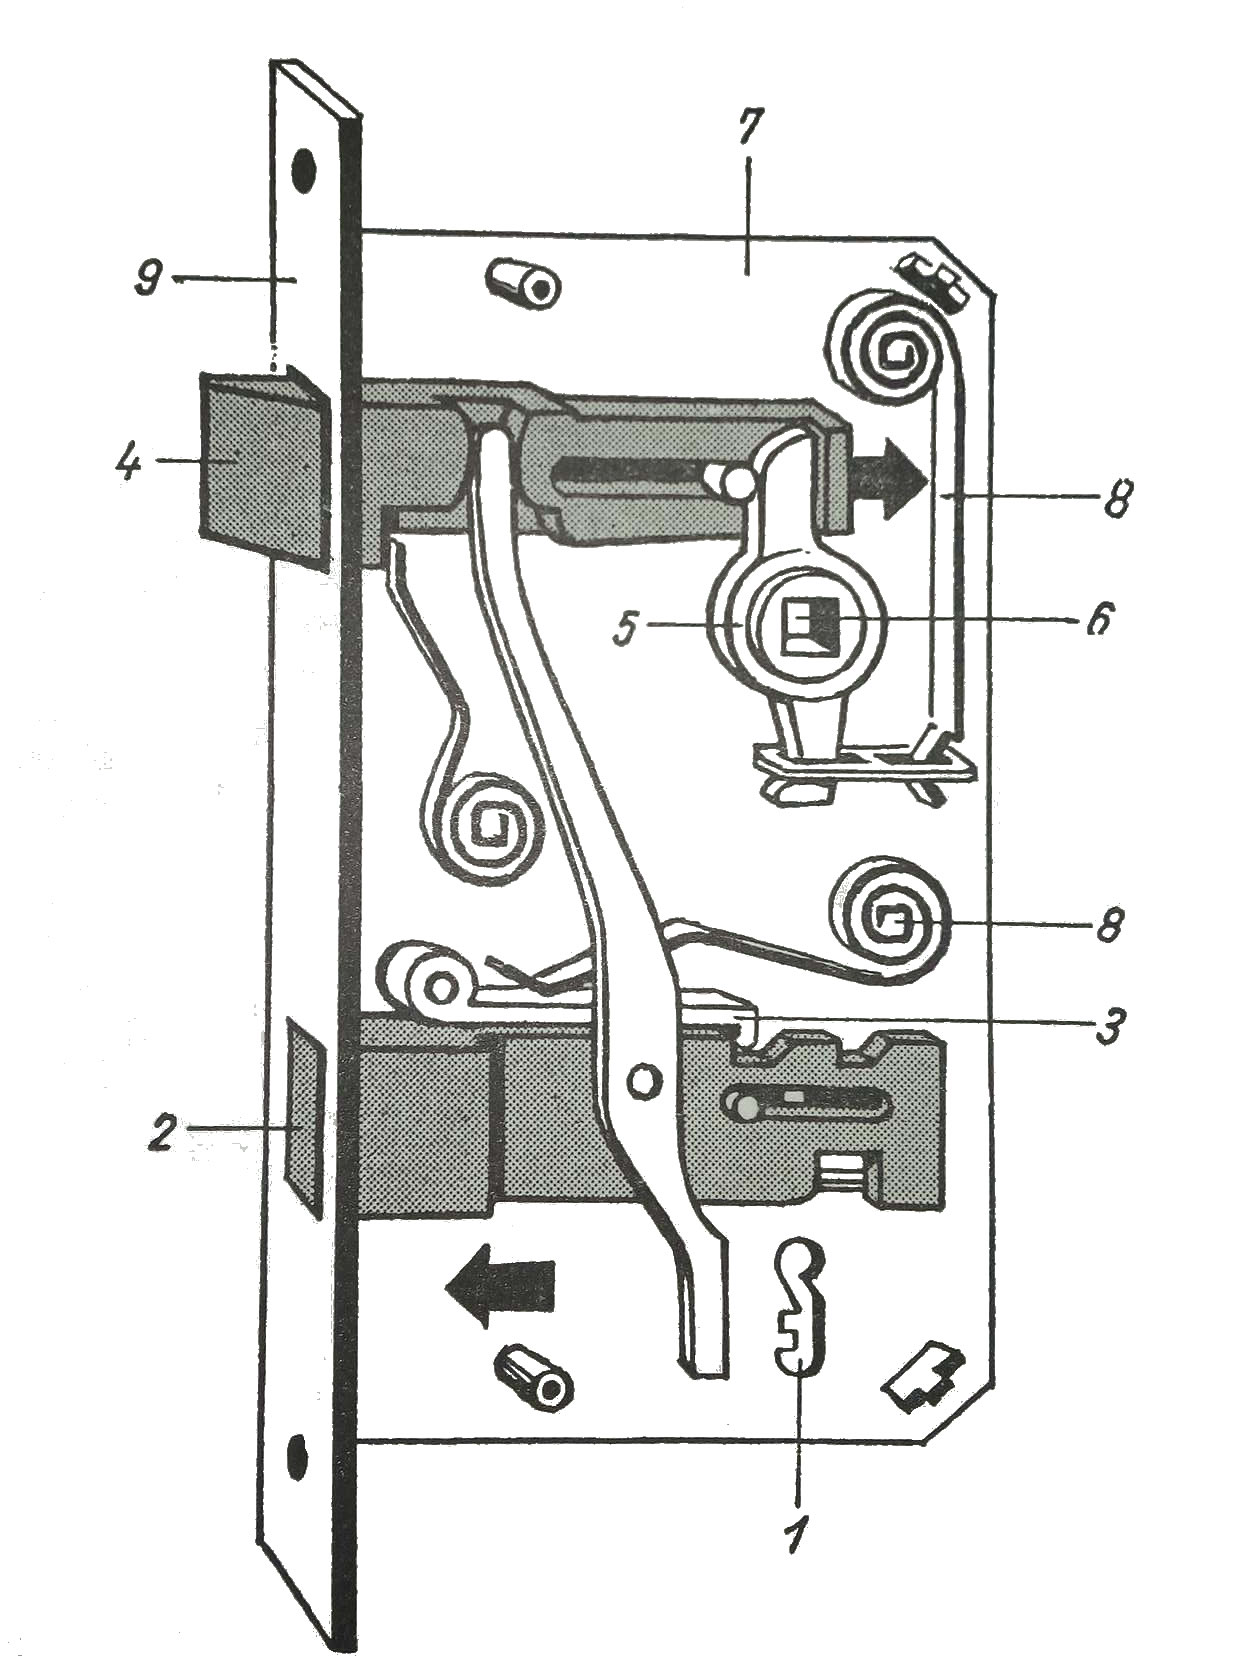
Figure 1 — parts of a mortise lock.
Historical repair procedures
The original text describes disassembling the case, removing the spring, and inspecting the bushing, latch arm, tab, and catch. The spring may pop out suddenly, and old mechanisms may have sharp or burred parts. Before disassembling the door, it should be secured against unwanted closing, and the parts should be arranged so that they do not get lost.
In the case of a worn handle opening, the text describes finishing with a file and covering the arm with a thin sheet. For the worn arm of the sleeve, it is specified to leave an edge from 1,5 to 2 mm. There are also mentions of replacing a broken spring, trimming the body sheet and working with a hammer and file. These measures belong to the original historical procedure and are not a tolerance for a modern lock.
Stretching and adjusting is described for a worn catch, with control of the lock in the open position; the bent part of the hook in the original text is about 1 mm above the tab. If the tongue of the handle and the opening of the receiving plate no longer match, the cause may be the door settling or lifting. Before expanding the opening, check the hinges, the geometry of the sash and the safety function of the assembly.
The historical manual recommends periodically lubricating rotating and sliding surfaces with acid-free oil. A modern manufacturer may require a different tool, so his instructions take precedence. After assembly, the lock should be checked while the door is open, so that it does not remain locked due to an incorrectly placed part.
Keys and the historical way of making them
For older keys with a spring, the original text states a leg 6–8 mm wide and describes the shape of the spring according to the mechanism. Today, a duplicate should be made by an authorized locksmith, based on the original and only with the right of the owner or user. Prints, measurements and photos of the key should not be publicly available.
The historical process includes measuring the raw key, clamping it in a vise, filing the arm and tongue, and checking the shape, as shown in Figure 2.
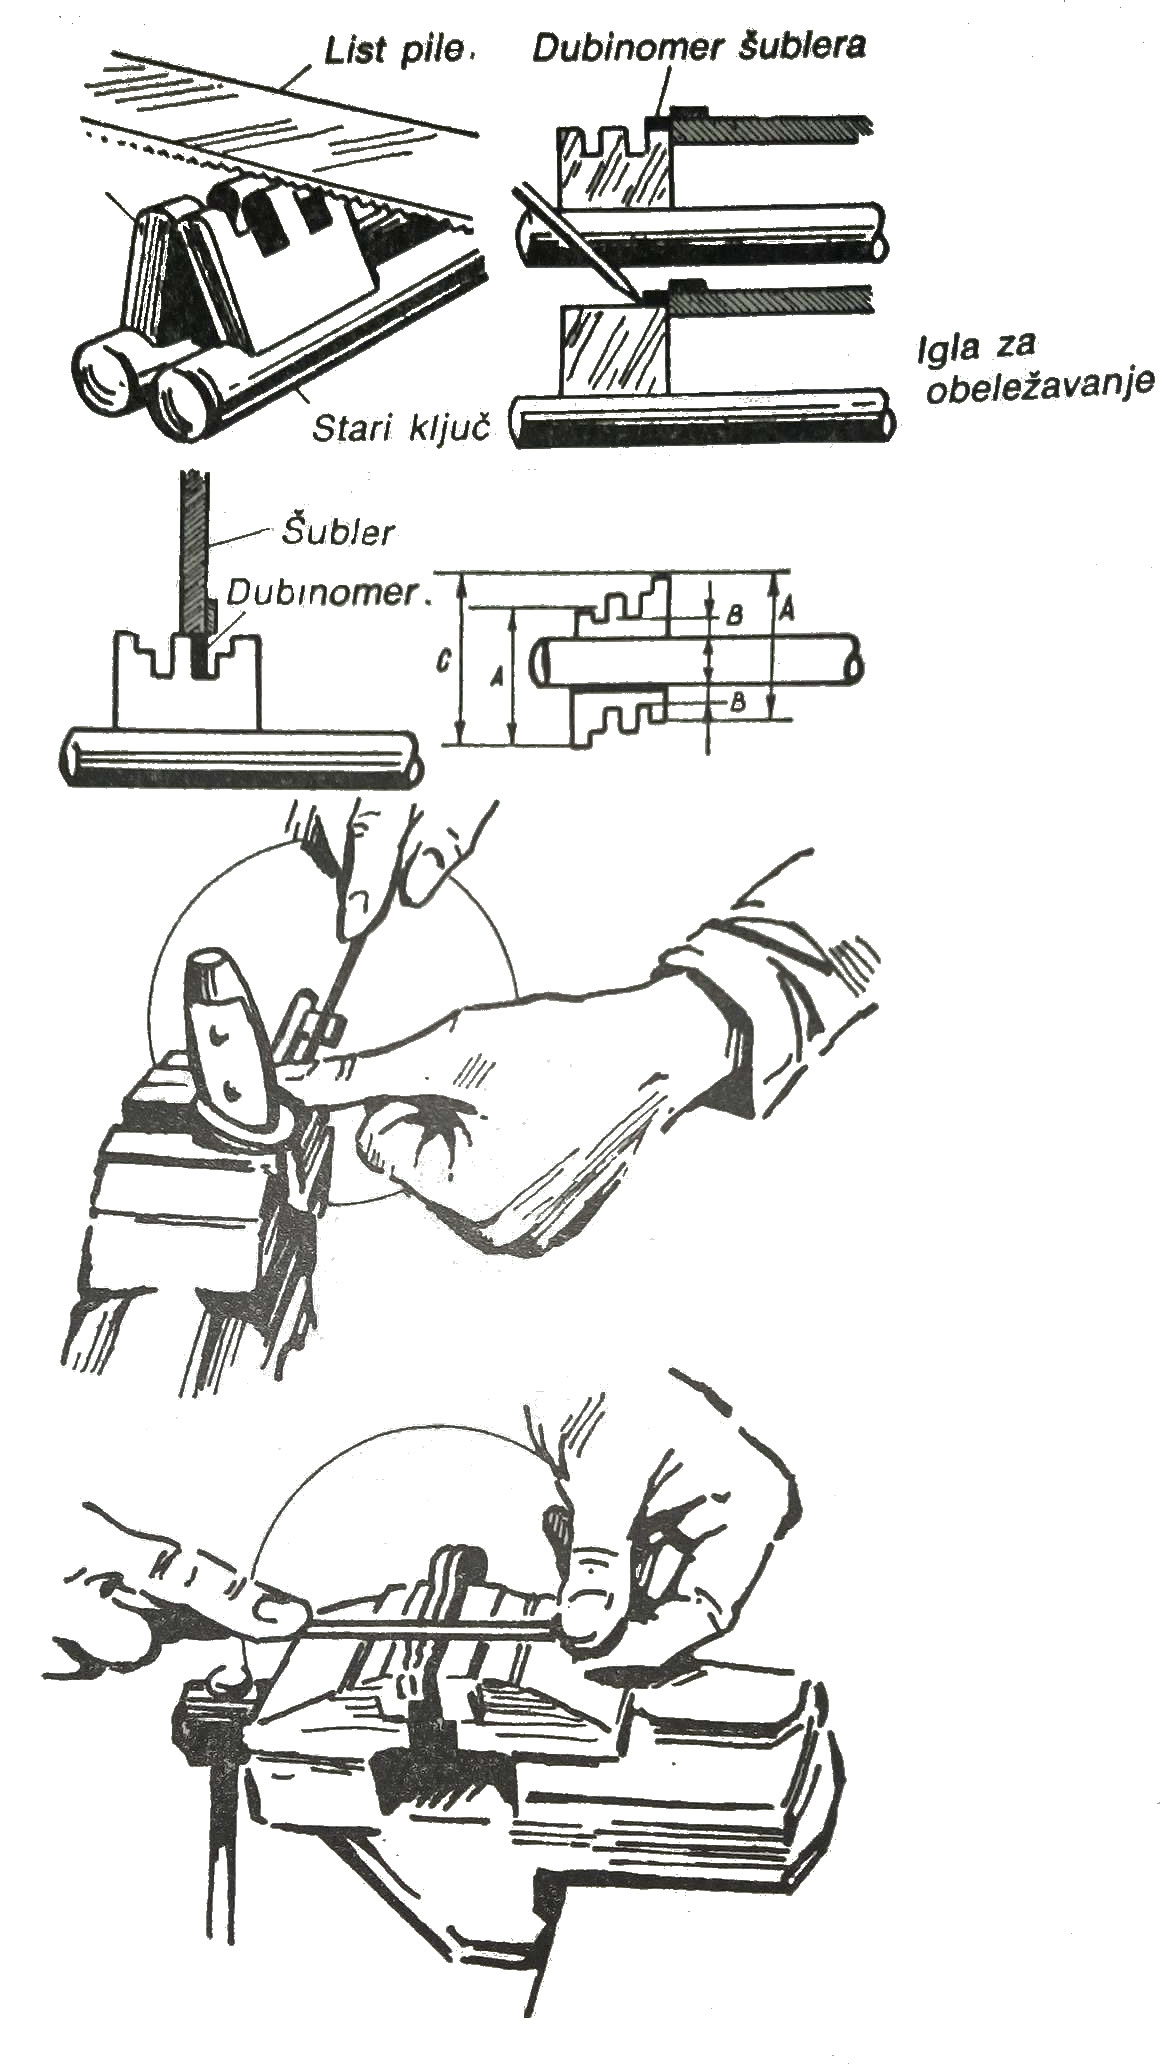
Figure 2 — historical process of making a key by hand.
In the following, the original describes transferring the position of the grooves from the original, cutting with a saw, finishing with needle files and rounding the edges. It has also been described that the feather was lit with a flame to detect the point of contact, and then washed with gasoline. Due to fire, fumes, burns and the possibility of unauthorized copying, this procedure should not be used; a suitable duplicate is made by a professional service with suitable equipment.
For keys with two feathers, the text emphasizes mutual symmetry. For the lock cylinder, he states that the production is much more complex and that it starts from the original. Modern secure profiles may require a security card or other authorization.
With stepped nibs, the historical text states that the number of possible variations increases with the number of steps: for six steps it states 720, and for eight 40320 variations. These statements are not a modern assessment of the security of the lock.
Historical modification and the modern security boundary
The original manual describes modifying a regular lock by drilling a 2 mm hole and adding a piece of nail 3 mm in diameter and 5 mm long. In the text, one end is adjusted to a diameter of 2 mm and a length of 3 mm, and a groove with a width of 3 mm and a depth of 2 mm is formed in the pen of the key. This is conveyed solely to preserve historical content: an improvised change may weaken the lock, block the exit, or invalidate the declared function and should not be performed on a door in use.
Opening direction, lock cylinder and hinges
When choosing a lock, it is important whether the door or window is left or right. The historical drawing shows the method of determination in the picture 3, in the upper part.
The original text describes Yale cylinder locks and Wertheim two-pin locks as safeties, and makes the historical claim of security, shown in figure 3, in the middle section. Insurance conditions and security classes today depend on the valid policy, standards, complete door assembly, cylinder, shield, receiving plate and mounting method; therefore, the old quote must not be used as proof of coverage or security.
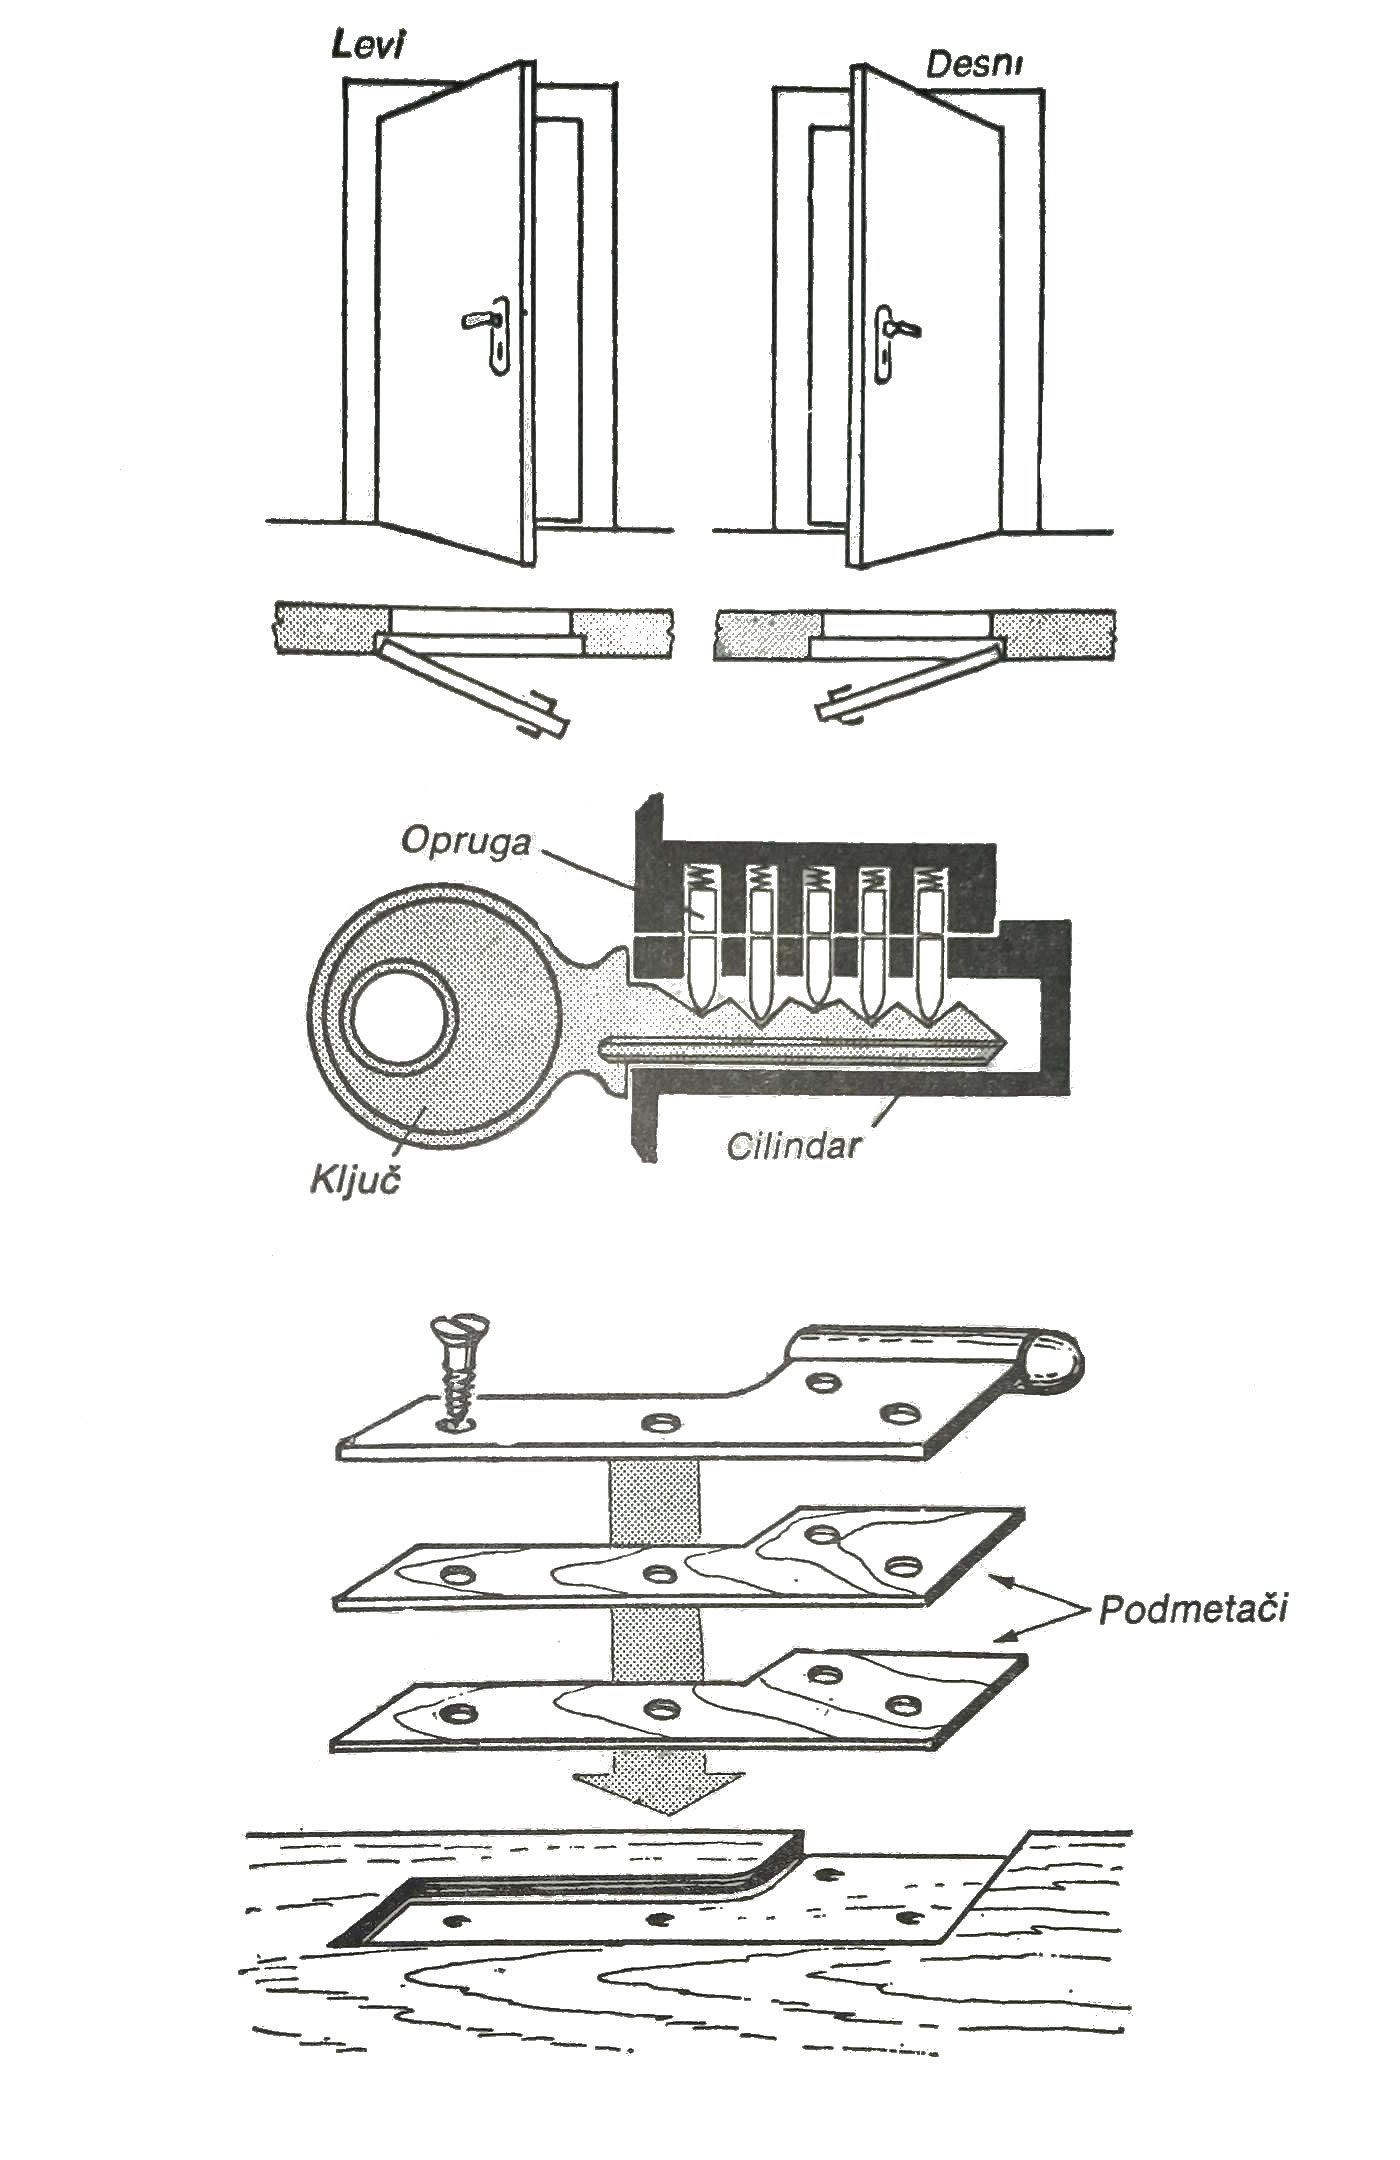
Figure 3 — locks, opening direction and hinges.
The lock works well only when the doors and windows close properly and the hinges are in working order and maintained. When replacing a hinge, the original text mentions a shim when the new hinge is thinner or an additional countersink when it is thicker. A shim describes a veneer tile of the same shape as the recessed part.
The lower part of the image 3 shows several historical hinge shapes and a coaster.
The choice should not be based only on the name of the hinge. Material, dimensions, mass and geometry of the sash, direction of opening, size of the opening, condition of the frame and method of attachment are important. Heavy, fire and escape doors require certified components and professional installation.