Archive practical content: the article preserves a historical overview of hand tools and home procedures of the time, but is not a safety instruction, professional training or recommendation to work on installations and wearables. Before work, you should identify the material, hidden installations, load and necessary protective equipment, inspect the tool and secure the workpiece. Electrical, gas, plumbing, heating and structural work should be left to qualified persons when there is a risk of electric shock, fire, explosion, leakage, flooding or loss of load capacity.
Today, Savo Kusić is focused on wooden windows, wooden-aluminum windows, custom windows, doors and requests for quotation. This article remains a historical archive and does not constitute an offer to sell tools, home repairs or installation work.
Basic tools
Hammers
A hammer has countless uses: hammering and riveting nails, finishing with light blows (carpentry, mechanics), striking other tools (chisels, punches, cutters), and so on. It is desirable to have at least two ordinary hammers of different weights, one of one hundred and the other of three hundred grams. If we often break open chests, drawers, crates, for which it does not matter if they will be damaged, a carpenter’s hammer will serve us best. Its nose is flattened and V-slotted, allowing it to be lifted under the head of the nail for relatively easy removal, using the hammer handle as leverage. By the way, in stores, we can find many types of hammers: some are intended for specialized work (carpenter, glassmaker, mechanic, wallpaper, electrician, boilermaker, carpentry hammer), and others are so complex that they are almost never needed for work that is usually done in the house, and are used only by craftsmen and other professionals.
Impact tool: use a hammer of the appropriate type and mass, with an undamaged head and handle, safety glasses and a stable position. Do not strike a hardened or damaged tool that is not designed for impact and do not use a hammer as a lever unless the tool manufacturer allows it.
Screwdrivers
We need to have two series of screwdrivers of graduated sizes, at least three of each type: for removing screws with a plain head and with a cross-cut head. Today, this last type of screw is increasingly in use, especially for white goods and cars. We can also unscrew screws of this type with an ordinary screwdriver of suitable dimensions, but this is quite unsafe and it is easy to damage either the screwdriver or the screw. Phillips screwdrivers (initially called Phillips) will be available everywhere and at a low price.
When purchasing a screwdriver, as well as any other tool, it is not worth saving on quality: a mediocre or weak screwdriver quickly warps, truncates and cracks, and the handle itself can break. We need to choose quality screwdrivers of the appropriate size, with a hard handle (for larger screwdrivers, a wooden handle is still best). All in all, we should choose a classic tool, which is solid and fits well in the hand. The handle of a screwdriver, like any other tool, is of great importance during use. If someone’s palms sweat a lot, they should avoid tools with metal or plastic handles, because even the slightest sweat makes the handles slippery. That it is not insignificant, we will easily see if we have to unscrew a more tightly tightened screw.
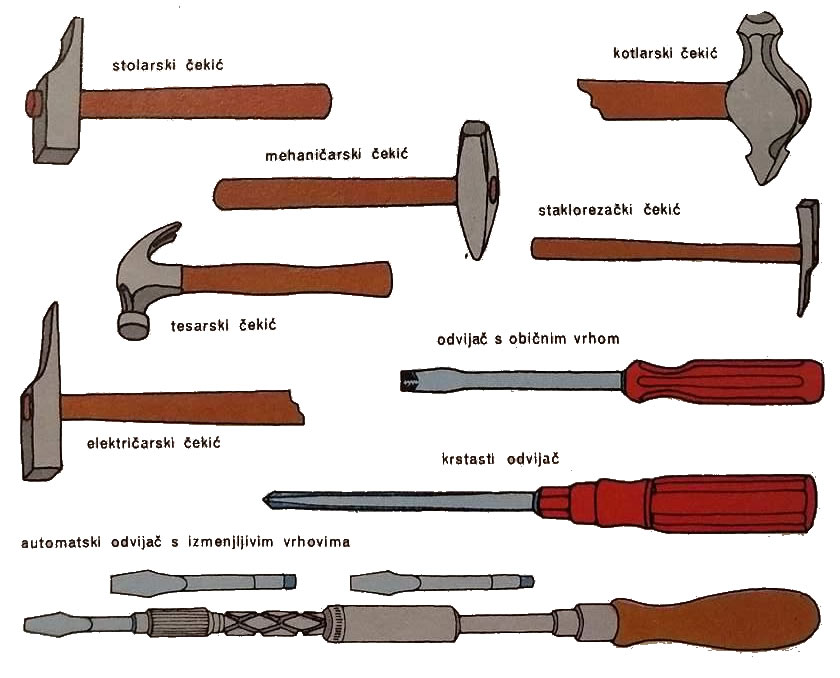
Hammers and screwdrivers for different purposes.
Chisels
A plain, all-steel flat chisel is useful for chipping away drawers and chests, for removing paint or resin from nicks on the heads of larger screws, and for chipping off the heads of baked-on screws that could not otherwise be unscrewed. Often for this operation we use screwdrivers that we hit with a hammer, which is completely wrong, because it leads to permanent damage to either the handle or the very tip of the screwdriver.
Screwdrivers and chisels: the profile and size of the screwdriver must match the screw; an ordinary screwdriver is not a safe substitute for a cross or other profile. For striking, use only a chisel or screwdriver specifically intended for striking, with eye and face protection. A baked joint can loosen suddenly or break the tool and requires a controlled procedure.
Pliers and wrenches
A group of tools with which an object can be held or clamped is used in a wide variety of situations: from changing the sealing rubbers in the faucet to pulling out nails; from unscrewing or tightening screws (on electrical appliances, on modular furniture), to unclogging a wide variety of containers; from forming a wire, to holding an object while soldering or heating on a flame. So we need different pliers and wrenches. Universal (combined) pliers allow you to hold any small object, to tighten screws, nuts, faucet handles (if a suitable wrench is not at hand). One part of universal pliers is derived from sheet metal shears and can cut steel wire two or three millimeters thick. Pliers with thin jaws (flat pliers) are used for shaping the wire and holding small, even sensitive parts during some assembly, disassembly, soldering.
A typical function of carpenter’s pliers is to extract nails, or to cut wire and smaller nails. Adjustable pliers (parrots) and adjustable wrenches with serrated jaws are used to tighten or loosen nuts and ring fittings (especially on plumbing), and to loosen any seized or overstretched element. They are simple and quick to use, as the jaw opening is easily adjusted. Their disadvantage is that they can cut or damage the object they are clamping. On the other hand, holding or tightening a pipe or ring fitting definitely requires serrated jaws. Therefore, whenever we want to tighten or loosen an element that has flat surfaces intended for wrenches of certain dimensions, we will use adjustable wrenches with smooth jaws. You should pay attention to this, especially if the nuts, bolts and ring hardware are made of a relatively soft material (brass, bronze, aluminum alloy). It is desirable to keep at least three adjustable spanners in the house, with possible openings from 15 to 50 mm. It is not out of place, if we often handle this tool, to have a richer collection of keys with fixed, standardized jaw openings.
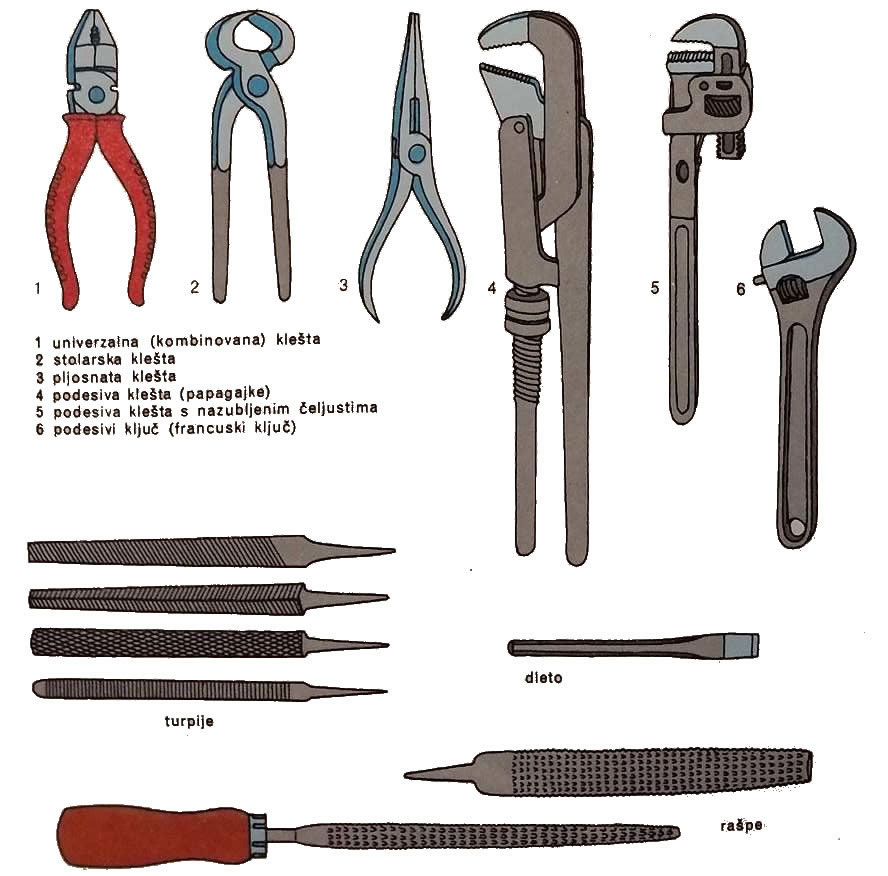
Pliers, keys, files and rasps.
Clamping, cutting and heating: use a wrench of the correct size for nuts, and pliers only when they are intended for the job. The workpiece should be clamped; direct the cut end of the wire away from people. Soldering and open flames require ventilation, removal of flammable materials and checking that there is no pressure, fuel, gas or electrical voltage.
File and rasp
Files are used for filing metallic materials, and rasps for processing wood, non-metallic materials and soft metals. On the body of the files, they are made (similar to fish scales), while the rasps have individually more or less prominent teeth. Otherwise, by cutting parallel lines, points, files are produced in six degrees of fineness (very coarse, coarse, semi-coarse, semi-fine, fine and very fine), and rasps in five.
To begin with, we need to get a triangular or flat file, then a medium coarse file and a rasp that is flat on one side and round on the other. Both tools are most often sold without a handle. That’s why we choose the handle that fits us best in terms of size, and don’t accept the first one that the seller offers us. The unpainted wood handles may be a little unsightly, but in any case they are easier to handle and not slippery. Let’s remember that files and rasps work by applying forward pressure, i.e. holding the handle in the right hand, while pressing the tip of the tool with the left. The position of the object in relation to the surface of the file or rasp must be horizontal.
A file without a handle is not ready for work: the point of the file must be properly seated in an undamaged handle with a ring, and the object firmly clamped. Do not press the sharp point with your bare hand and use eye protection when there is a possibility of sawdust.
Wall drill
Quite often, it is necessary to fasten not only light shelves, but also heavier furniture to the walls, and for this purpose, the store offers a large selection of dowels (plugs, inserts) made of nylon, plastic, rubber. To drill the wall and properly insert the dowel, the cheapest tool is still the classic wall drill. It is a tool composed of a steel handle with an interchangeable drill tip in various thicknesses. The hole is drilled by hitting the shank with a hammer and occasionally turning the drill bit left and right to keep it from getting stuck in the wall. It is good to have at least two such drills: one for 5 mm dowels and another for 10 mm. This tool is useless if we need to drill a hole in a reinforced concrete wall. For this job, we need an electric vibrating drill with special drill bits made of very hard material (so-called vidia drill bits).
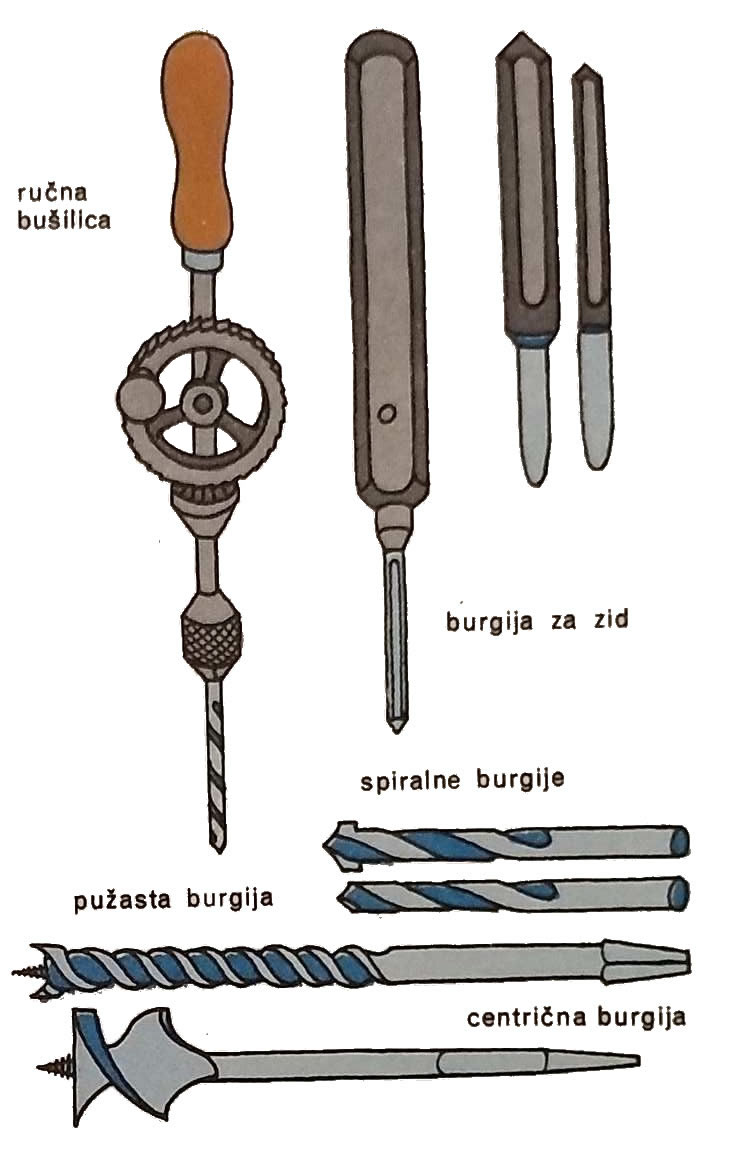
Hand drills and different types of drill bits.
Wall drilling and fixing: before drilling, check for hidden electrical lines, water and gas pipes, wall composition and possible hazardous materials. Dowel, depth, diameter and load capacity are selected according to the substrate and the actual load; a heavy or hanging load is not attached just according to the general advice from the archival text.
Other basic tools
To complete the basic household tools, we need to acquire another group of equipment and tools that are not used so often, but are indispensable for certain works. This equipment is not expensive and does not take up much space: a simple hand drill with gear transmission and drills from 2 to 8 or 10 mm in diameter; a dot for marking the place where the hole should be drilled (on metal); one-handed bandsaw for wood; one hacksaw with two or three spare blades; awl and needle drill for drilling starter holes for wood screws; a pair of universal wooden or metal clamps (screws), for holding objects under pressure during the gluing phase, and for many other things; one wooden carpenter folding yardstick; steel tape measure; a pair of strong scissors (for cutting cardboard, thinner plastics); a smaller spirit level that can be very useful for aligning pictures on walls and other hanging objects.
Mechanical tools
If we want to engage in more complex mechanical work (on plumbing, on mechanical parts of household appliances, on locks, metal parts of furniture, etc.), we will have to buy the necessary tools for that as well. These include, first of all, a set of wrenches for nuts with standard jaw openings and a selection of allen keys, also standard sizes. By the way, hex keys (hexagonal body bent into an L) are used for unscrewing and turning screws with a round head and a hex slot. We will also be getting a pair of slim, bent-jaw pliers, one hand vise, a series of taps, a series of taps for tapping pipe and round bars, and a hand turner to go with them. At the same time, let’s stay with smaller dimensions - ten to twelve millimeters in diameter, because in order to process objects with larger diameters, a craft-industrial tool kit is needed, which can hardly find its place in the house and be of real use. Threading larger threads means working with elements (pipes, flanges, joints, supports) that are part of larger plants that are the responsibility of specialists. For example, gas or plumbing expansion should always be left to a handyman who is experienced enough and knows all the “tricks” to do the job well. Cutting, threading and fitting pipes, joining them, bending and shaping them may seem simple. In fact, it is a job that requires a lot of skill, not to mention the waste of materials, work that is difficult to accept from the aesthetic side, and many other troubles. In addition, in order to carry out some more complex works (and to successfully bring them to an end), you need to work at a work table with vises and in an equipped room.
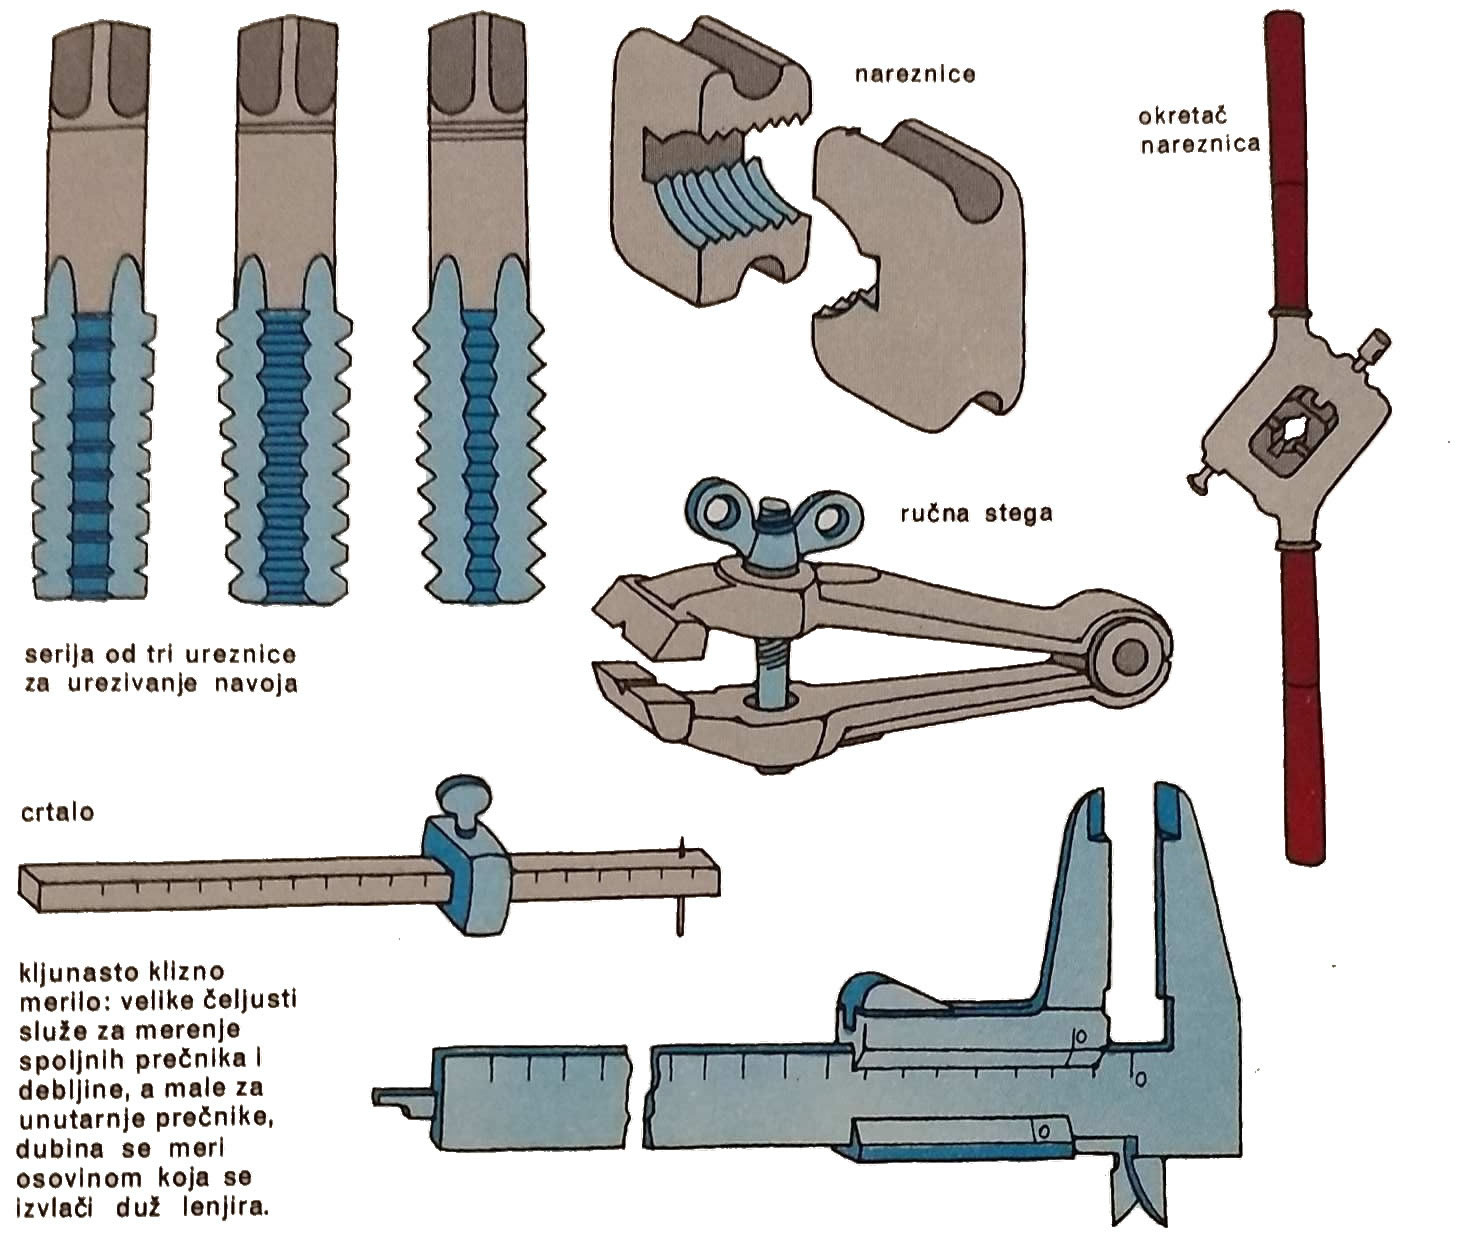
Engravers, thread cutters, vise, ruler and measuring tape.
In the end, we will need to get a few more screwdrivers, files of different sections, dimensions and fineness, a ruler with which to mark the object with a needle, a square and a movable protractor (both made of steel), a hollow and comprehensive compass for measuring internal and external diameters, an awl (needle) for marking, a hammer with a plastic ram, which, despite strong blows, does not distort the metal object and does not damages, a movable beak gauge (caliper) for measuring thicknesses and diameters with high precision, one electric soldering iron with a copper tip and a gas or gasoline heating lamp.
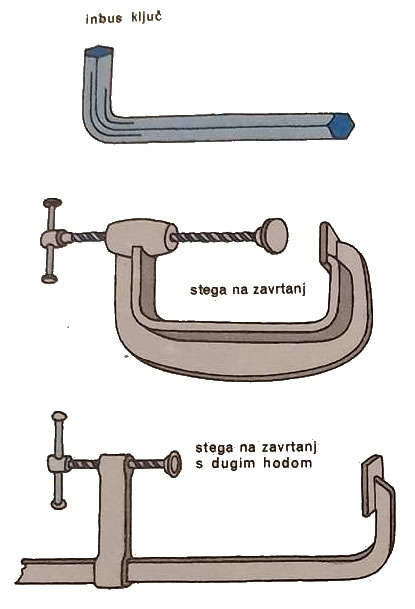
Allen key and clamps.
Installations, threads and flames: work on gas, water, heating and other installations is carried out by authorized or qualified contractors according to local rules. Before cutting or heating, the pipe must be identified, isolated, relieved and checked. A gas or gasoline heating lamp introduces the risk of fire, explosion, burns and harmful fumes and should not be used in an untested enclosed space.
Carpenter’s tools
A large part of the work that we can do ourselves in the house is carpentry work. Therefore, we will present the equipment and tools that we will need if we want to do woodworking more often.
In addition to the already mentioned manual leaf saw (the so-called fox tail), we will need a carpenter’s saw with a string to tighten the leaf, or a more modern type with a metal tube frame, and a two-way fine saw about 20 centimeters long is also necessary. Its rectangular blade with small teeth enables more precise work when cutting small grooves, notches, cutting plastic boards, etc. For straightening and smoothing the wood, especially the sides of pre-tested boards or drawers whose sides are too wide, we will have to use a planer. We will still need one wide and one profile grater made of metal or wood according to your choice.
Recently, a file-type grater (surform) has been used, which instead of a steel knife has a kind of sharp metal mesh that can be changed. Although the area scraped with this tool is not as smooth as after processing with a classic planer, it will serve us usefully when we have to align the sides of some plastic board glued to wood. When processing plastic, the grater dulls quickly, while the file grater, since it has many cutting elements, lasts much longer. Recently, other tools have been made on the principle of a file grater. Thus, in the trade, you can find numerous types of drawn sheet rasps: with one or two handles, different dimensions, different fineness on the lower and upper faces - round, pointed, in the shape of a “mouse’s tail”. This type of rasp is particularly useful because it allows to perform work that is normally done with ordinary round or semi-round rasps, but due to its good flexibility, it can also be filed in very inaccessible places.
Chisels are essential for making grooves, notches, recesses, furrows. We should have a set of three or four chisels, with blades from 6 to 22 millimeters. For certain carpentry works, special types of chisels (for example, chisels) or round chisels that have a body and blade rounded in the shape of a nail are necessary.
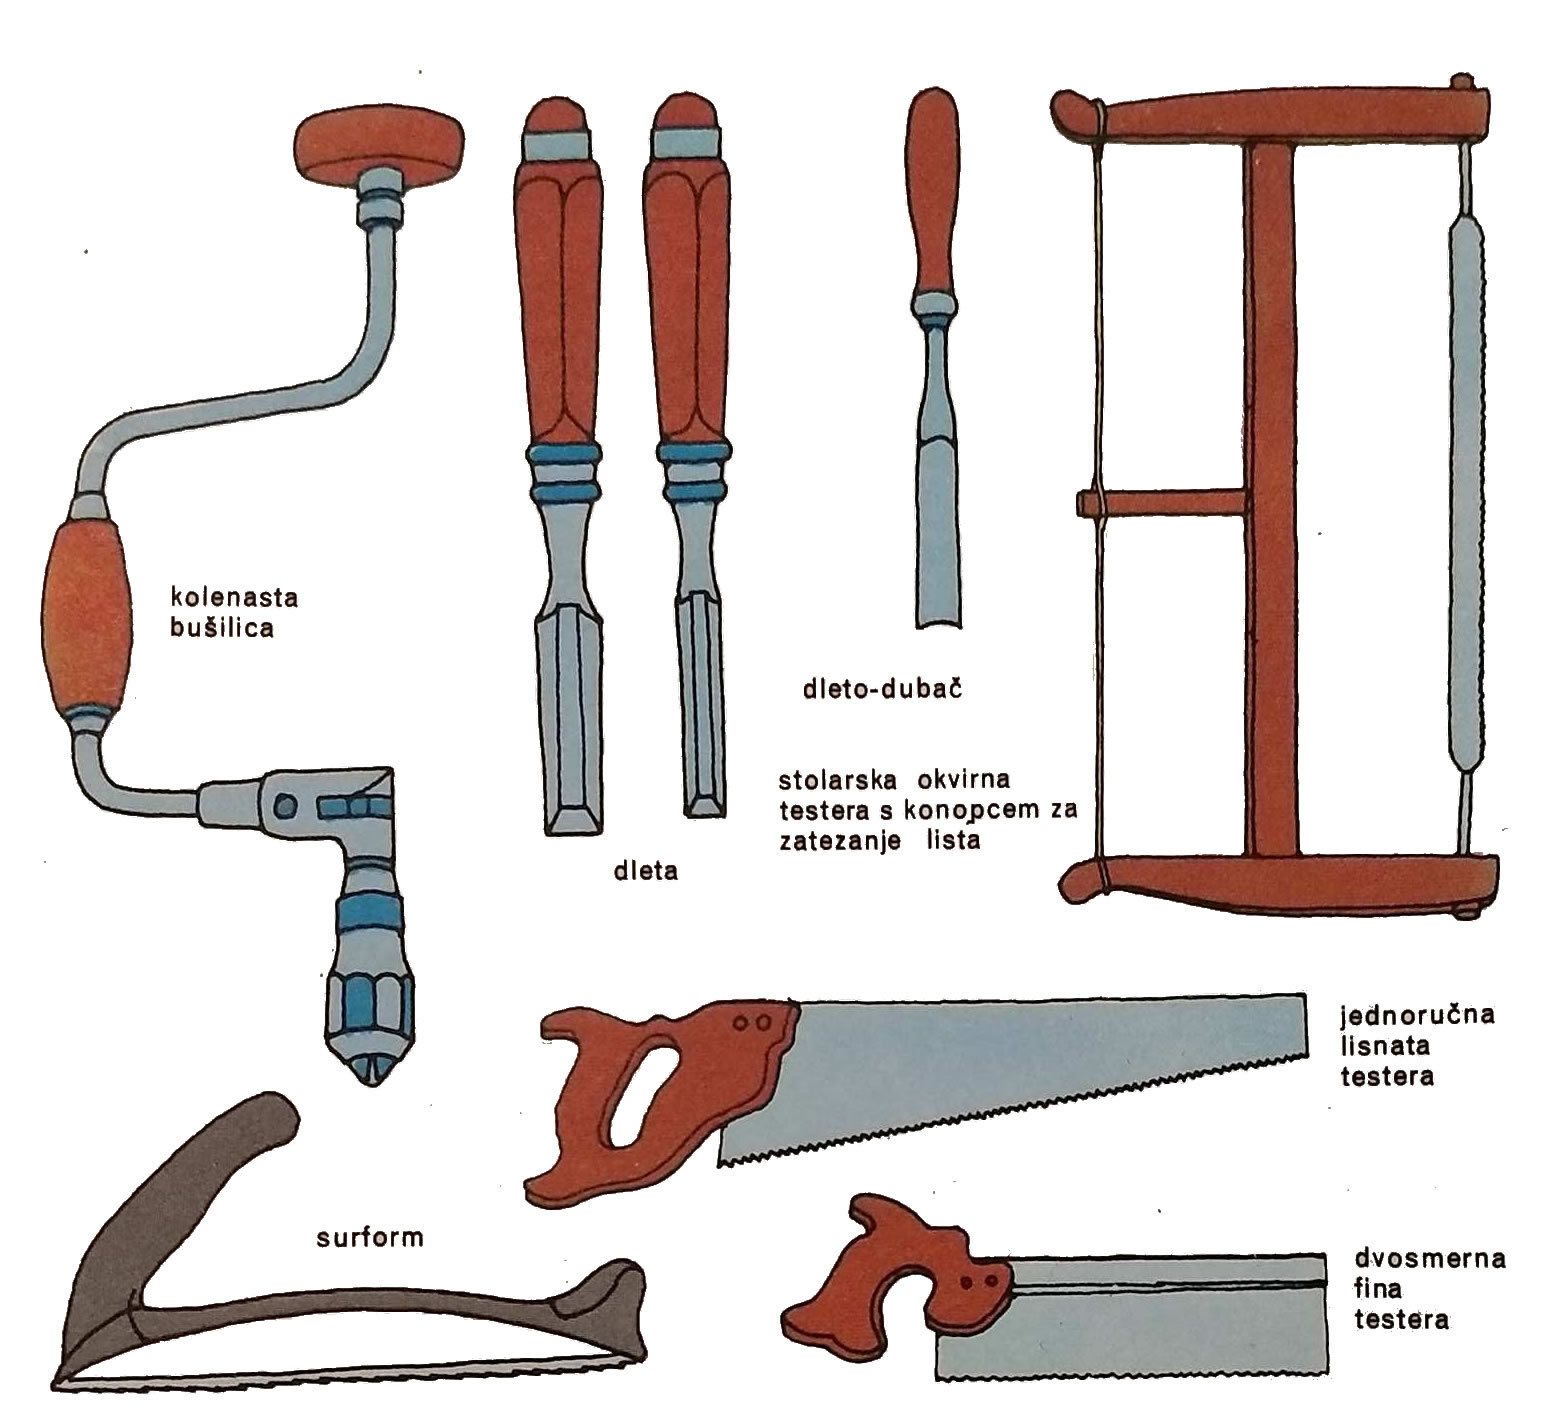
Carpenter’s chisels, saws, drill and file planer.
In order to sharpen the blades of the planer and chisel, we also need a carborundum sharpener, which we use to smooth out any unevenness. That’s the first, rough sharpening. For a final, fine sharpening, a very smooth whetstone that is coated with grease is required. By the way, the sharpening of these tools, especially the drill, is a delicate job and requires a lot of time. Due to the risk of damaging the tool by improper sharpening, it is better to give it to specialized workshops in the beginning, than to stop working halfway or even to buy a new tool.
When performing carpentry work, it is often necessary to glue, that is, to keep the parts tight to each other until they are completely glued. Therefore, we need several vises, scaled sizes and tightened with screws, or simply friction-locked (the usual type used by craftsmen).
For drilling holes with larger diameters, blind or through, we need to get a hand crank drill and a series of spiral, auger and center drill bits.
For marking, we will need a carpentry angle-winkle (two sides are of different thicknesses) and a carpentry drawing made of wood (with a metal marking pin). Otherwise, tradition dictates that when marking with a pencil and square, we use a carpenter’s pencil with a flat shape and lead.
Blades, saws and sharpening: the workpiece must be clamped, hands out of the path of the blade, and the tool sharp and undamaged. Sharpening and sharpening requires a suitable sharpener, stable support, eye protection and blade temperature control; Cracked or incorrectly mounted grinding wheels are not used.
Electrician’s tools
Important - the historical text below is not a safety instruction: do not work on the electrical installation and open electrical equipment under voltage. The power supply is switched off, secured against being switched on again and the absence of voltage is confirmed by a suitable tester on all relevant conductors. A unipolar “glimerica” is not sufficient proof of a voltage-free state. Unclear installation, damaged insulation, live metal parts or working in a wet area require a shutdown and a qualified electrician.
We can do a lot of electrical installation in the house, maintenance and repairs of electrical consumers ourselves. The tools needed for this work, apart from the basic ones (hammer, screwdriver, pliers, wrench, etc.), are few and require large investments. There are, first of all, pliers for removing insulation. They have specially shaped jaws with which the insulation jacket is removed from the cable (if, for example, we want to connect wires). They are also used to cut and fasten the ends of wires and terminals (contact terminals). By the way, the clamp comes in various forms: ring, fork, pointed, festoon type, etc. Also very useful is a glimmer (phase tester) - a screwdriver with a built-in high-value electrical resistor and a small light. It will serve us to determine which wire or part in a circuit is live and which is not (by touching live elements, the light turns on), and it is also used to check whether there are live metal parts on an electrical consumer. If we determine that they are, then it means that there has been a breakdown of the insulation inside the consumer (more or less difficult, therefore dangerous), which must be repaired immediately.
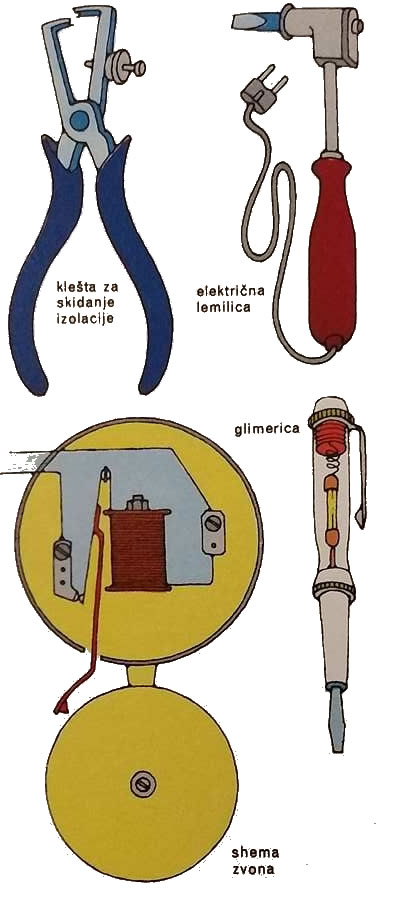
Historical overview of electrician’s pliers, soldering iron and unipolar tester.
A battery-operated alarm bell with a sufficient number of longer electrical wires is also useful. With it, we determine the beginnings and ends of permanently laid cables in distribution boxes, sockets, switches, at exits from the ceiling.
Although it is not often used, an electric soldering iron of modest power, such as that used by craftsmen in radio repair shops and in electronics in general, is also needed. It will be used for connecting wires to terminals, for connecting components inside consumers and for similar tasks.
Device connections and repairs: the method of terminating the conductors must correspond to the type of clamp and the manufacturer’s instructions; soldering is not a universal substitute for a prescribed joint. A device with a breakdown of the insulation is not “repaired” under voltage, but is immediately switched off, separated from use and handed over to an expert for inspection and measurement of protective measures.